Photography Tutorial · 2020-03-08
How to Edit Dark, Magical-Style Photos: A Few Steps in Camera Raw
Thomas Chu Photo
Many of you particularly love my snow mountain photos processed in a dark, magical style.
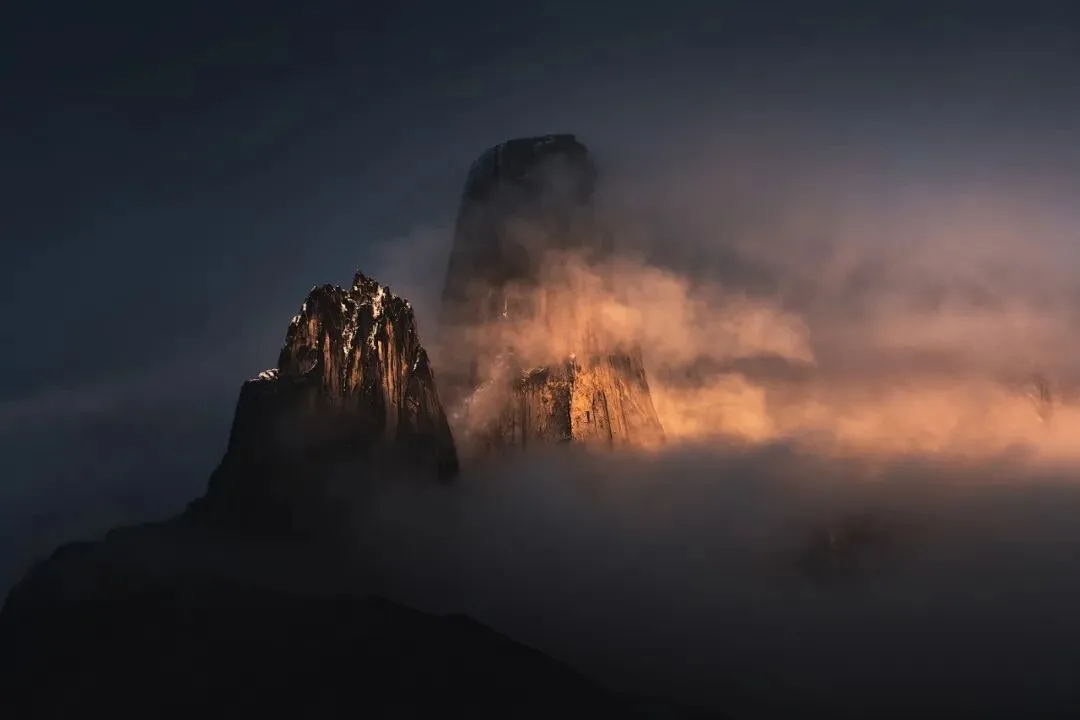
In fact, this look isn't hard to achieve in post. Once you grasp the core mindset and techniques, a few steps in Camera Raw are all it takes.
In today's video tutorial, Thomas shares how to quickly create the dark, magical look.
Video Tutorial
▶ Watch the video tutorial on Bilibili
This is the illustrated companion to the video above. Many of you love Thomas's dark, magical snow mountains — yet the look takes just a few steps in Camera Raw: read the histogram, drop the exposure to set a dark base, add warm-cool split toning, then shape the light with gradients and radial filters. The walkthrough below follows the video step by step with interface screenshots — replicate it by following the numbers.
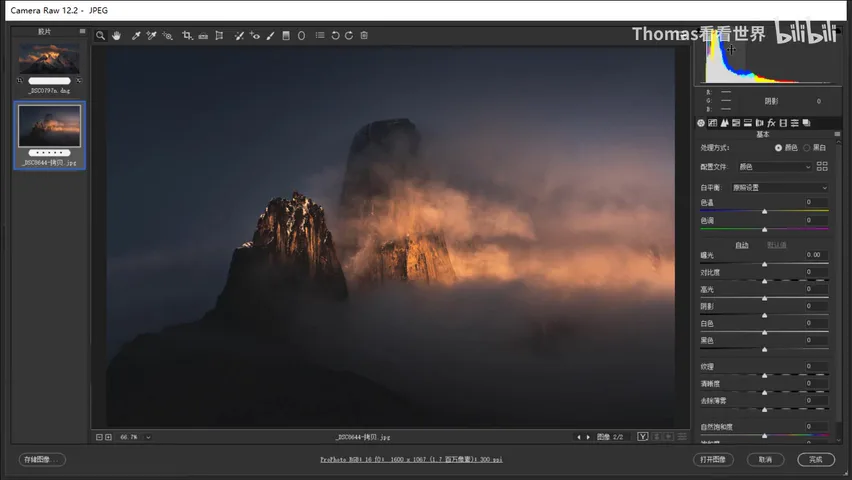
01 What Defines the Dark, Magical Look
Understand the target before touching a slider. Open the histogram of a dark magical mountain (at 0:29 in the video): pixels pile up on the left — the base tone is genuinely dark — yet a cluster remains on the right: the highlights survive. Color has a clear division of labor too: highlights lean orange, yellow and red, while shadows run cyan, blue and purple. A dark base, cool surfaces and warm accents — the magic grows out of this brightness-and-temperature structure.
02 Step One: Exposure Sets the Base
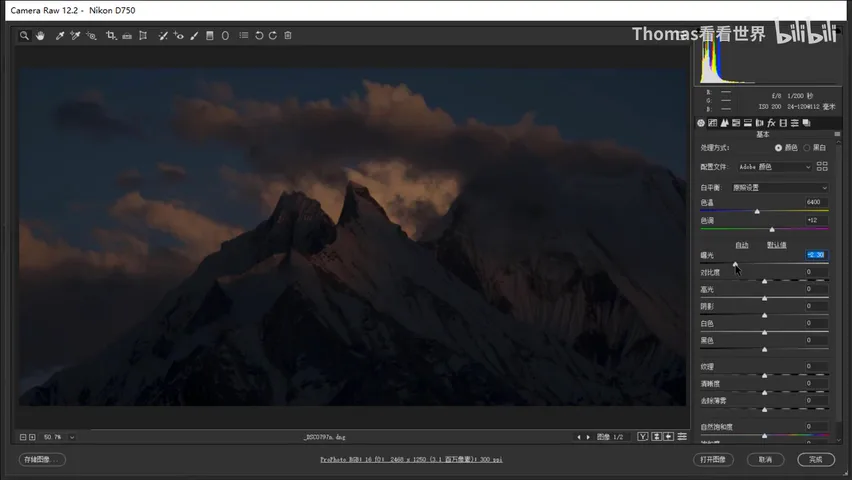
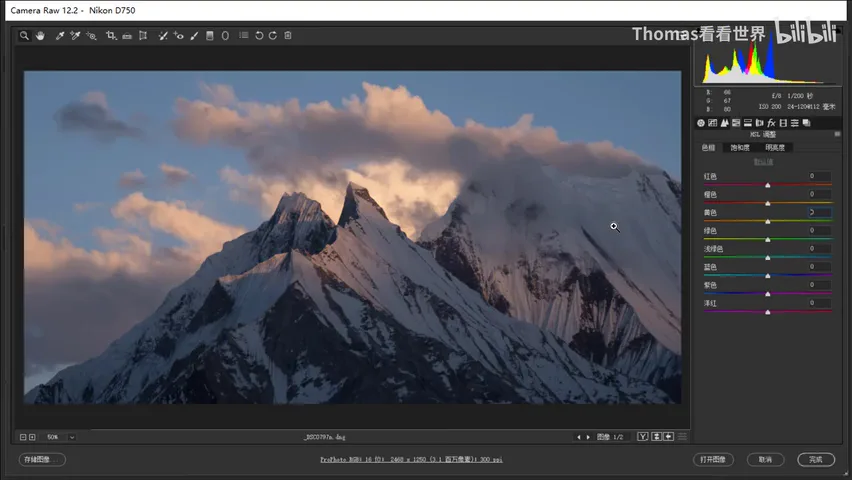
The case study is a snow mountain Thomas shot in Pakistan. Reset to Camera Raw defaults, it's a flat frame: sunset light, but a plain blue-sky-with-clouds day (at 1:22 in the video). The core panel for a dark look is Exposure: in both Photoshop and ACR the slider has a wonderful property — however far you drag it down, the left side of the histogram never clips into underexposed black. Dropping exposure is therefore the fastest, most comfortable way to a dark base. This frame went straight to -2.3; the photo turns inky, but flat with it (at 1:50 in the video).
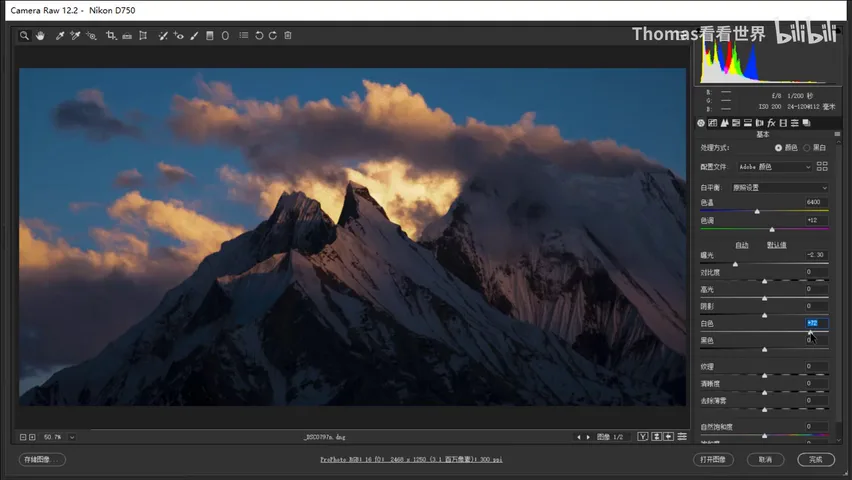
The Whites slider restores contrast: it decides where the rightmost pixels of the histogram sit. After the global darkening, the brightest spots are barely midtones; slide Whites rightward and the highlights climb back (at 2:25 in the video). Stop at a good value — a touch further and you can trim the Highlights slightly, keeping the clouds behind from shouting (at 2:57 in the video).
03 Step Two: Split Toning and Gradient Dimming
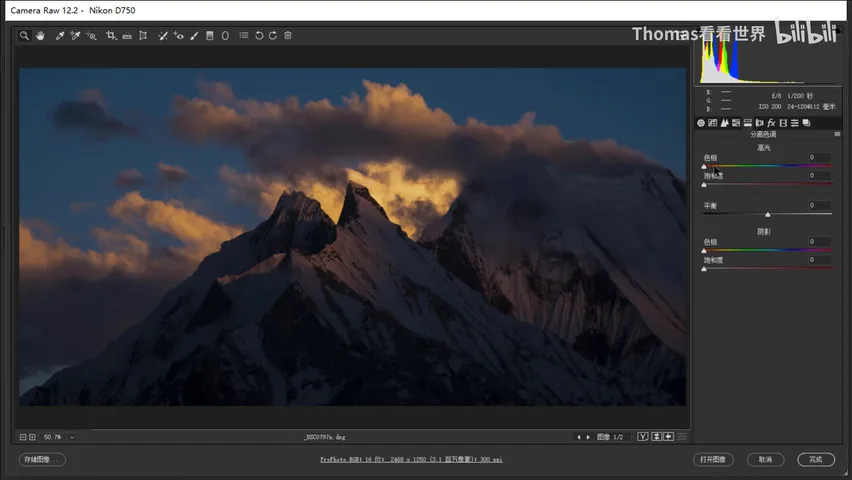
Tone is set; now color. In Split Toning, give the highlights orange — hue around 30, saturation pushed to about 40 — while the shadows stay untouched on this frame (at 3:12 in the video). Then in HSL, drop the brightness of blue so the cool sky sinks deeper (at 3:26 in the video).
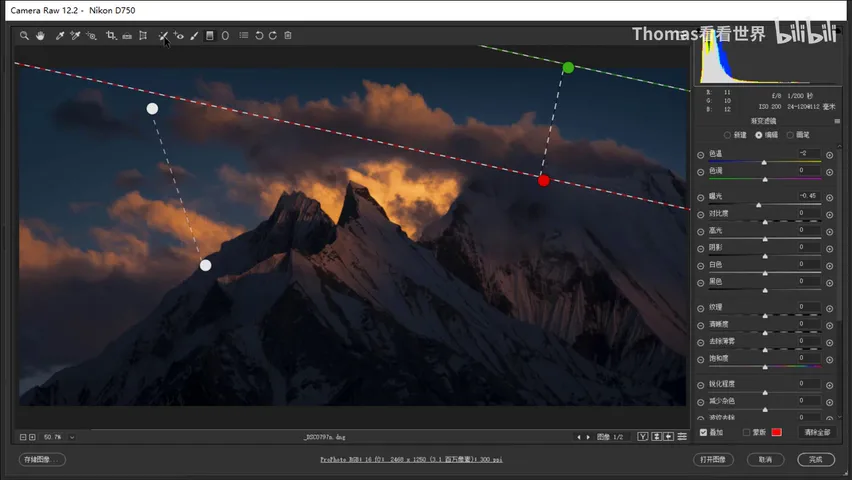
The frame still isn't dark enough, especially around the edges. Pull the sky down with a Gradient Filter: temperature -2, exposure -0.45; drag another across the foreground, easing the edges into shadow — effectively a vignette (at 3:44 in the video). If the earlier HSL blue reduction overshot, nudge the saturation back here.
04 Step Three: Radial Filters Shape the Light
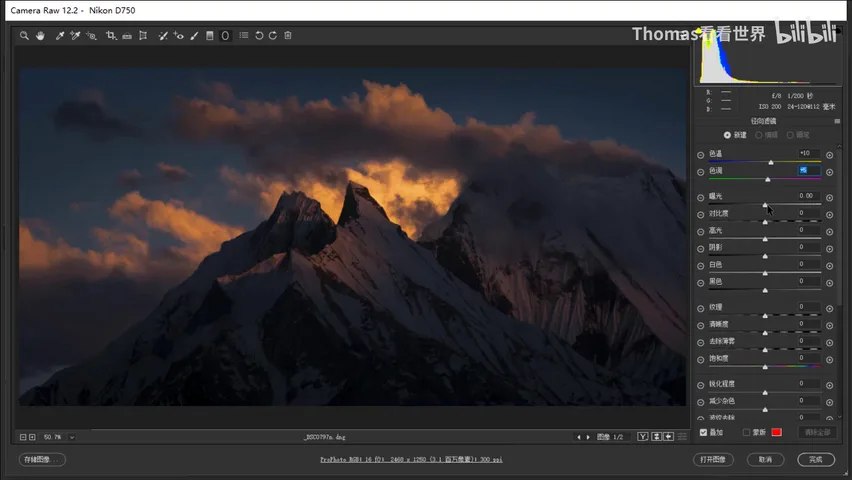
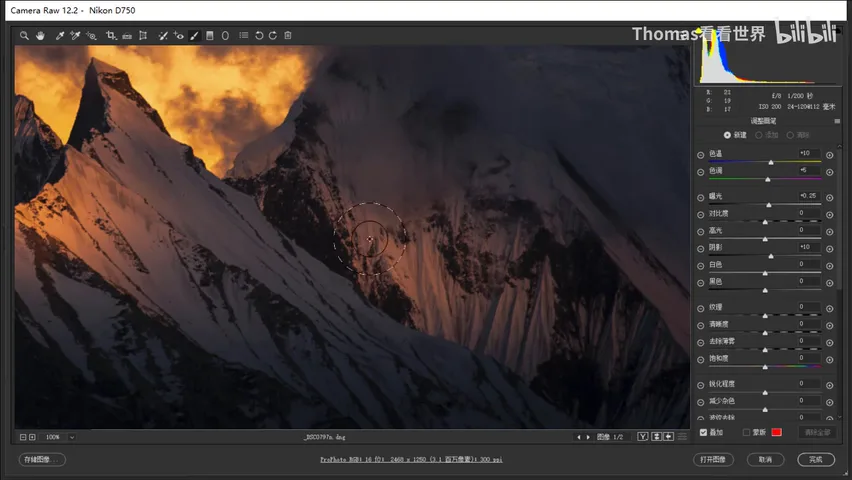
The base is dark, but the highlights don't sing yet. Radial filters add the light: raise the temperature (toward yellow) and the tint (toward purple) — purple plus yellow mixes into a fitting orange-red; exposure +0.25 with a modest shadow lift (at 4:13 in the video). Then paint peak by peak: the snowfield caught some original light — strengthen it; tap both flanking summits; then one big ellipse to brighten the whole massif (at 4:45 in the video). If the clouds start to blow out, keep pressing the Highlights down.
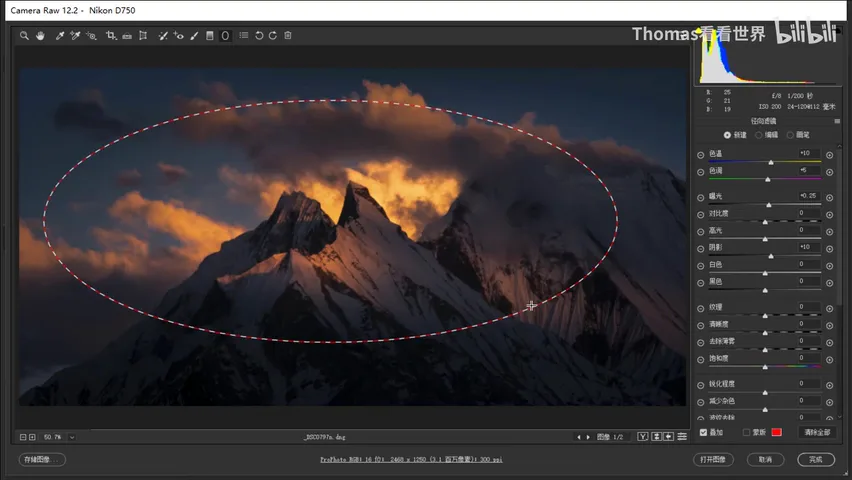
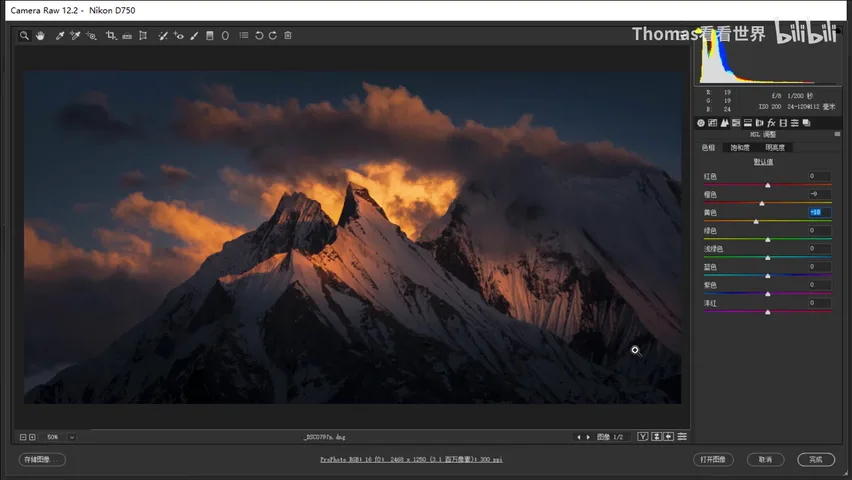
For texture, stack Texture and Clarity onto the mountains that already received the warmth-and-exposure brush, coaxing the rock folds out; add a faint stroke of raking light on the summit — in reality clouds blocked the sun there, but in post you can grant it a beam, so the whole ridgeline reads as lit by the setting sun (at 5:31 in the video). A final unified pass shifts the yellow hue a touch toward orange, and the magical golden warmth is locked in (at 6:10 in the video).
05 Before and After, and the Core Idea
Reset everything to Camera Raw defaults and you're back to a bland near-sunset snapshot; with exposure, split toning and local adjustments, a few minutes turn it into a dark, magical mountain (at 6:25 in the video). No step here is advanced technique — the difficulty is always analysis: knowing what the style looks like, where the light should come from, and how warm highlights balance cool shadows. In post-processing, ideas matter more than Photoshop skills, always.
1. The dark-magic recipe: a darkened base, warm orange highlights, cool cyan shadows — read the histogram before you touch anything; 2. Big exposure cuts won't clip black, and the Whites slider retrieves highlights — the fastest path to a dark tone; 3. Split toning handles warm-cool, gradients handle the edges, radial filters sculpt the light; 4. Texture, clarity and synthetic raking light add the final magic — but everything serves the question of where the light comes from.