Photography Tutorial · 2023-02-19
Essential Light Strengthening for Landscapes: Luminosity Masks + Blend Modes
Photography is an art of light — it tests the photographer's control of natural and artificial light on location, and it also calls for post-capture refinement and enhancement.
Light strengthening naturally enhances glowing clouds, reflections, and subject highlights — a very important technique in landscape post-processing.
In today's video tutorial, we explain and demonstrate light strengthening in detail — and how powerful luminosity masks become when combined with layer blend modes.
Video
▶ Watch the video tutorial on Bilibili
This is the fully illustrated companion to the video above. In last week's sunset-photo edit, the pivotal step was "light strengthening" — the sunset-lit faces of the mountains became brighter, redder and more dimensional; in the video Thomas breaks the technique down step by step, then extends it to conjuring light out of nothing. This article follows the same order, with keyframe screenshots for every move.
01 Light Strengthening vs Light Rendering
Start with the before/after of this sunset frame over Santa Maddalena in the Dolomites (at 0:33 in the video): after processing, the light on the sunlit mountain faces is visibly stronger and redder — as if the last glow is striking the rock. Making existing light stronger is light strengthening; its sibling, conjuring light where there was none, is light rendering. Both share one underlying logic: a blank layer, Overlay or Soft Light blending, and a brush or gradient with restrictions.
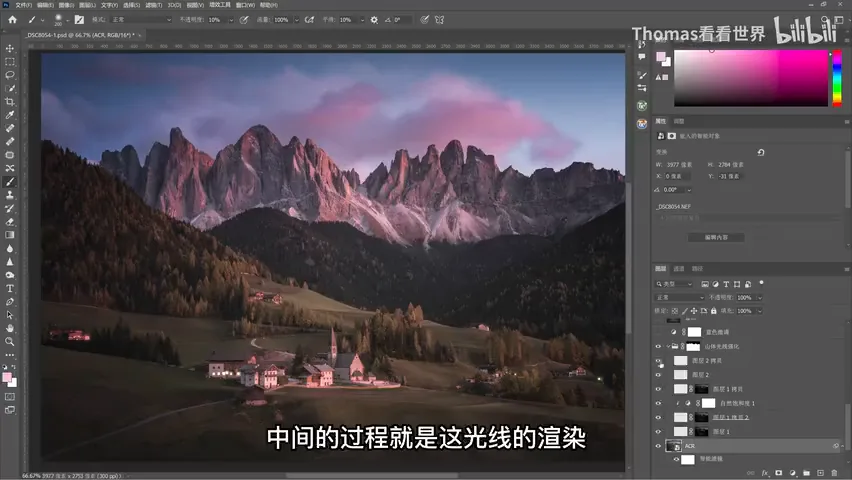
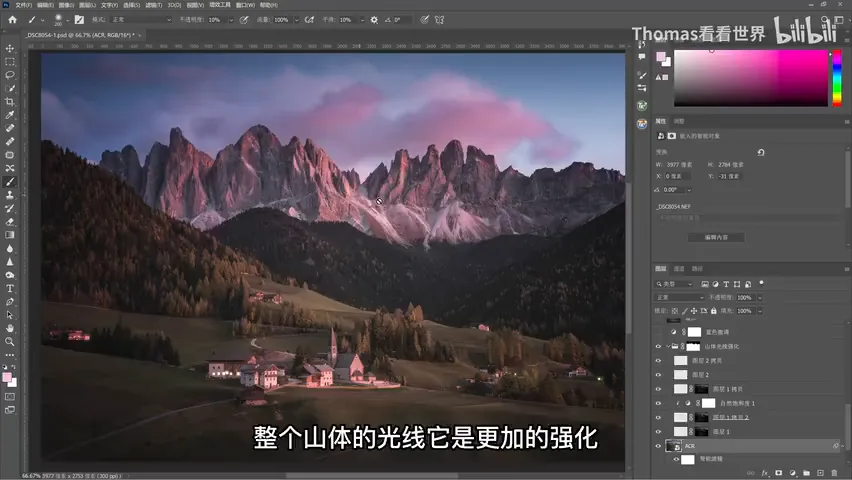
02 Step One: Sample Color, Paint on Overlay
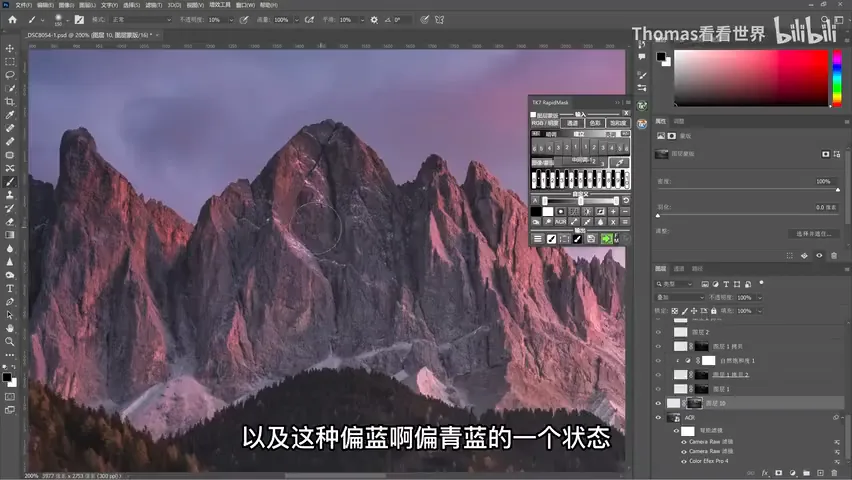
Create a blank layer and set its blend mode to Overlay or Soft Light — Soft Light is gentler, Overlay stronger; try both (at 0:52 in the video). With the Brush tool, open the foreground color panel and sample the existing sunlight color from the photo — here, the glowing clouds — then fine-tune: a bit brighter, a bit more saturated (at 1:13 in the video). A handy check: set brush opacity to 100% and dab once to preview the color — Thomas finds it slightly purple, nudges the hue toward red; once happy, drop the opacity to about 10% and start painting for real (at 1:35 in the video).
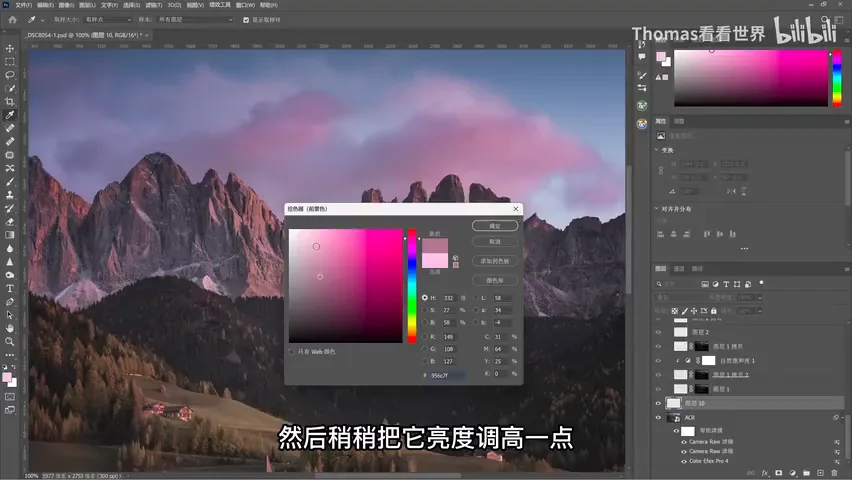
Paint the sunlit faces boldly (at 2:10 in the video): wherever the brush passes turns brighter and redder, and the peak stands out as if bathed in afterglow. Don't worry about sloppy edges, stray strokes into shadows or the sky — the next step, a luminosity mask, will clean up the boundaries.
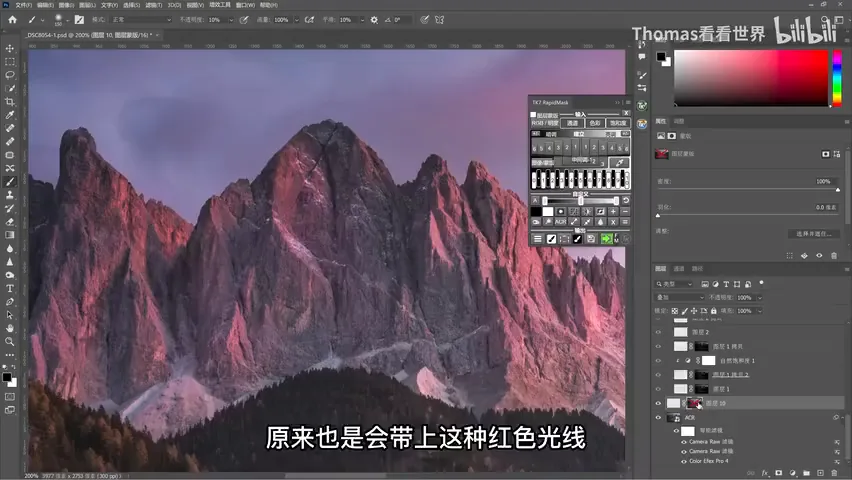
03 Step Two: Luminosity Masks Draw the Line
The bold approach has an obvious cost: shadowed areas never received that light, and painting them red turns the whole mountain into a flat blob (at 2:35 in the video). The fix is a luminosity mask: generate a "Lights 1" mask with the TK panel (or the Photoshop actions from earlier tutorials) and apply it to the light layer (at 2:52 in the video). Lights 1 roughly matches the frame's existing brightness, so after the restriction only the originally brighter rock receives the paint.
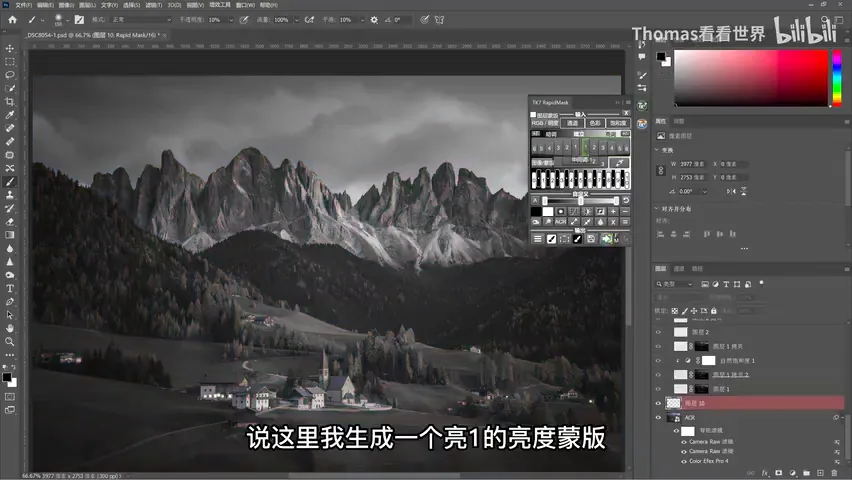
The result is immediate: shadows return to their original depth, keeping their blue, cyan-leaning cast (at 3:26 in the video) — warm red lights against cool blue shadows, contrast actually stronger than a uniform red wash. Now keep painting freely: with the luminosity mask in place, every stroke looks natural and never touches the shadows (at 3:49 in the video). Finally compare blend modes: Soft Light is softer, Overlay stronger — Overlay wins for this photo, and the before/after speaks for itself (at 4:10 in the video).
04 Step Three: Group Masks and Midtone Fill
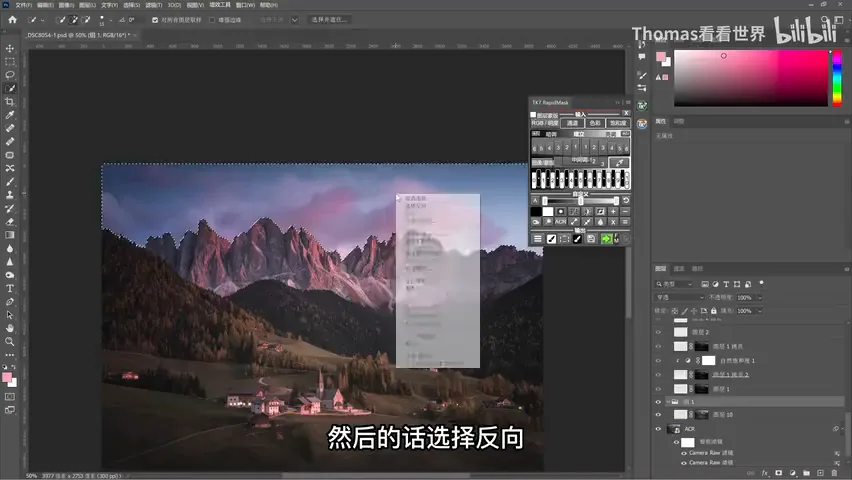
Stray strokes still occasionally land on the clouds, while this stage is only about the mountain (at 4:23 in the video). Put the light layers into a group and mask the group: select the sky, invert the selection to grab the mountain, and create a mask from it (at 4:37 in the video). Alt-click the mask to inspect it: the group mask says "ground only", the layer's own luminosity mask says "highlights only" — together the rendering applies exclusively to the bright parts of the mountain, never the shadows or the sky. Precise control (at 4:50 in the video).
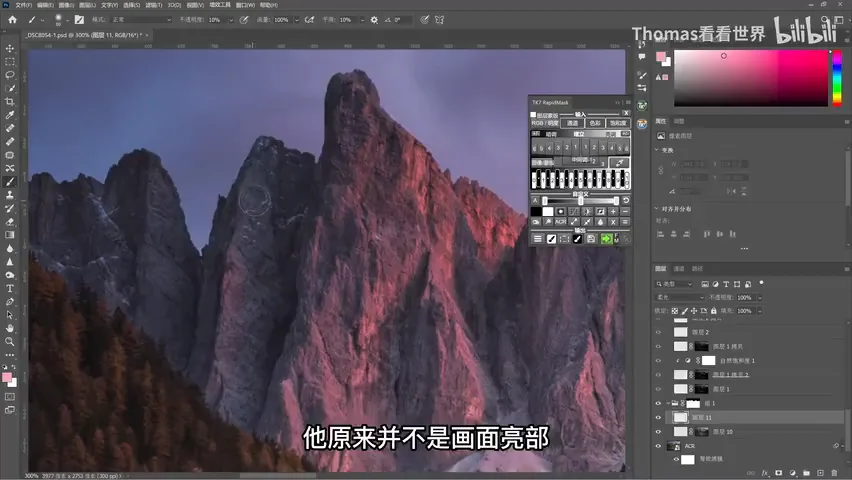
Inside the group, add a Soft Light layer for midtone fill (at 5:19 in the video): some areas were never highlights, yet you want them redder — paint carefully at 5% opacity, with a lighter, brighter foreground color. This step deliberately steps outside the luminosity mask, letting midtone regions pick up the glow too (at 5:51 in the video). The clouds' red can be strengthened as well: create a blank layer outside the group (group layers are mask-restricted, outside layers are not), set Soft Light, sample the clouds' purple directly, and sweep at 5% opacity to intensify them (at 6:23 in the video).
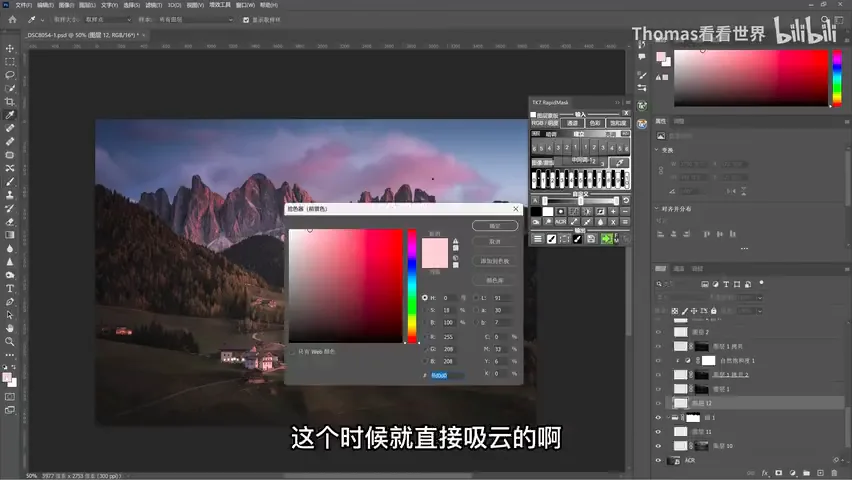
05 Light Rendering: Conjuring Light from Nothing
Everything so far made existing light stronger; light rendering adds a beam where none exists (at 6:45 in the video). Same principle: on a Soft Light blank layer, pick the Gradient tool, second option — the "Foreground to Transparent" gradient in the Basic set — at 20-30% opacity with a bright, not-too-saturated foreground color, then drag from the direction the light should come from — instantly a beam appears to stream in; more drags, more light (at 7:24 in the video). Duplicating the layer into Overlay and dragging again intensifies it. This is only a demo — the photo won't actually get the beam — but the move is worth remembering.
Rendering reads even better when paired with darkening (at 8:26 in the video): another blank layer in Soft Light with black as foreground, and a linear gradient to darken the opposite side — once light and dark redistribute, one side glows while the other falls off, and the transition of light appears. The whole technique compresses into one line: a blank layer in Overlay/Soft Light, colors sampled from the photo with tuned saturation and brightness, painted (or gradient-dragged) onto what you want lit, and bounded by region or luminosity masks (at 8:53 in the video).
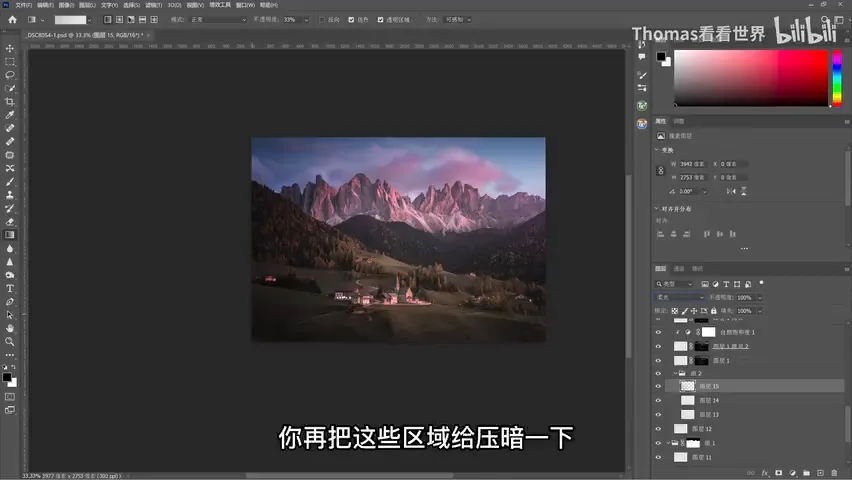
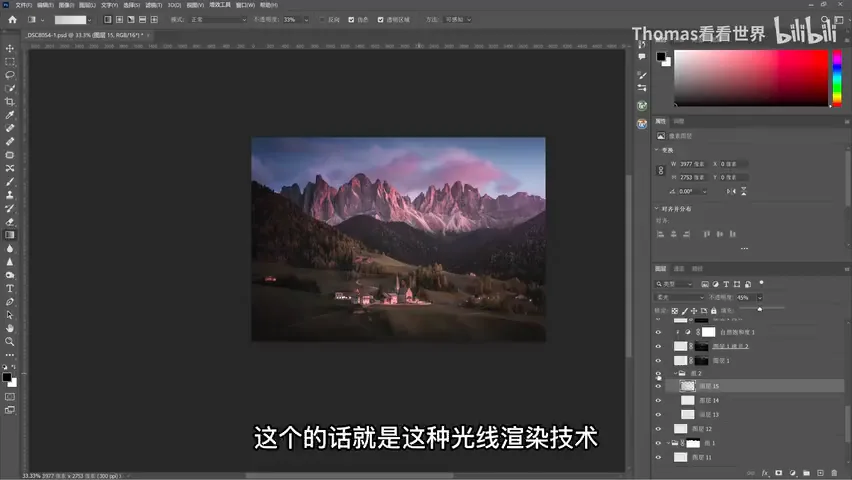
1. Light strengthening and rendering share one logic: a blank layer in Overlay/Soft Light, colors sampled from the photo, and a low-opacity brush; 2. A Lights 1 luminosity mask confines the effect to highlights, a group mask confines it to the ground — the double restriction lands precisely on "the bright parts of the mountain"; 3. Midtone fill steps outside the luminosity mask with careful 5% strokes, and clouds get their own layer outside the group; 4. For rendering, drag a foreground-to-transparent gradient to create the beam and a black gradient to darken the far side — redistributed light and dark produces the transition of light.