Photography Tutorial · 2017-03-26
Soft Focus in Post: Make Your Photos Dreamy and Hazy
You've probably seen dreamy, hazy photos — many of them use a post effect called the Orton effect (soft focus).
There are many ways to create soft focus in post; today I'll introduce the easiest one — the Classical Soft Focus filter in the Nik plugin.

Video Tutorial
HD video link:
https://v.qq.com/x/page/m0387edy2kl.html
Key Takeaways
Nik Collection -> Color Efex Pro 4 -> Classical Soft Focus makes soft, dreamy effects quick and easy.
If you haven't installed the Nik Collection yet, download the official free version below.
Nik Collection free plugin, download links for China (v1.2.11):
Windows: https://pan.baidu.com/s/1o8jhgxk
Mac: https://pan.baidu.com/s/1hsJlkpQ
The photo below shows how it looks before soft focus is applied.

After softening with Nik Classical Soft Focus, the photo changes in two big ways:
1) The distant mountains and stream appear veiled in mist — hazy, romantic, dreamy.
2) Sharp foreground with a soft background matches the painter's "atmospheric perspective," giving the photo more depth and dimension.

All of this comes courtesy of the Classical Soft Focus filter in the Nik plugin.
Open Classical Soft Focus and you'll find 7 options in the panel: Method, Diffusion Detail, Strength, Brightness, Shadows, Highlights, and Control Points.
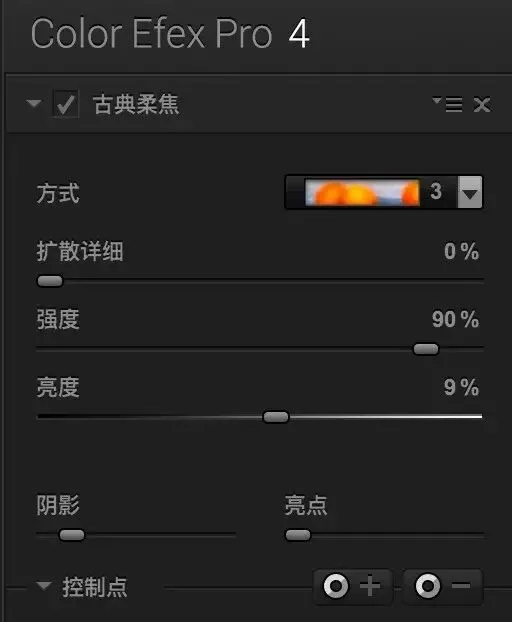
The Method menu offers six presets: Soft Focus 1/2/3 and Diffusion 1/2/3.
The numbers 1, 2, 3 represent brightness — 1 is brightest, 3 darkest. "Soft Focus" vs "Diffusion" determines the blur intensity: the three Soft Focus presets blur less and look more natural, while the Diffusion presets blur more, like viewing the photo through frosted glass.
Moving the Diffusion Detail slider right adds grain to prevent color banding after softening — see "Don't Let Color Banding Ruin Your Photos" for the underlying principle.
Strength defaults to 50; higher values reduce sharpness and increase contrast.
Brightness controls overall brightness, while the Shadows and Highlights sliders recover under- and overexposed detail after filtering.
Finally, Control Points let you confine the softening to parts of the frame — skin, distant scenery, highlights, and so on. For details on Nik Control Points, see the "Nik Color Efex Pro Plugin User Guide".
Generally, avoid applying soft focus to the entire image. A balance of sharp and soft makes a photo natural and striking.

Follow @Thomas Chu Photo, and learn one photography skill every week.