Photography Tutorial · 2019-03-31
Nik Silver Efex Pro: Crafting Black-and-White Masterpieces
Thomas Chu Photo
Nik Silver Efex Pro is a powerful Photoshop plugin, and the most popular black-and-white post-processing plugin for PS.
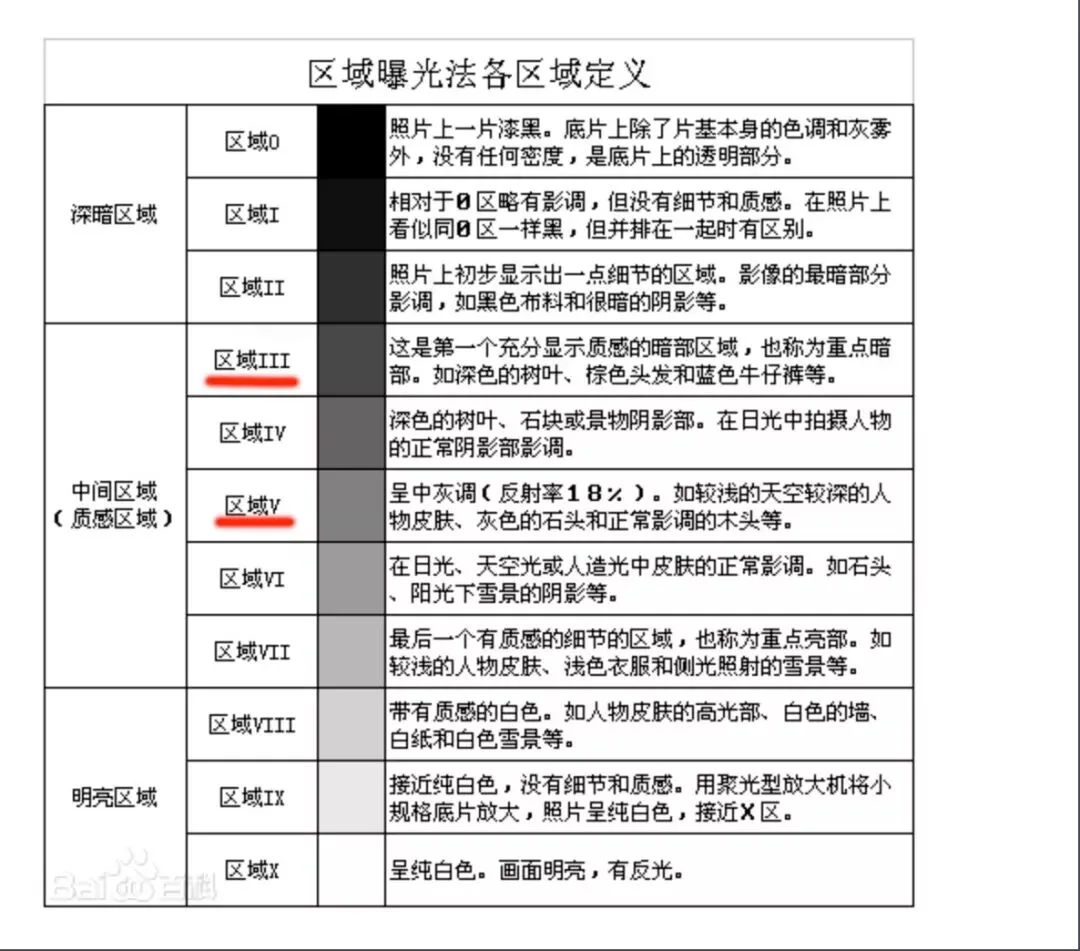
In "Nik Silver Efex Black-and-White Plugin Tutorial (Part 1)", Thomas covered basic features such as the preset library, the Adams Zone System, and effect comparison.
In this tutorial, Thomas continues with the plugin's parameter panel, demonstrating its precise and powerful tonal control.
1
Parameter Panel Overview
As before, open the Nik black-and-white plugin via the Photoshop menu: "Filter - Nik Collection - Silver Efex Pro 2".
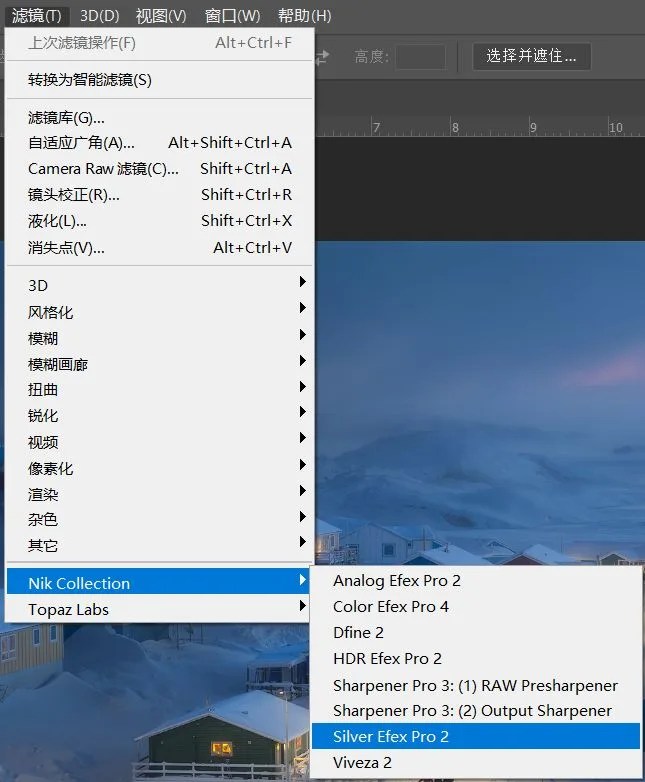
If you haven't installed the Nik Collection plugin set, reply with the keyword "下载" in the WeChat official account dialog to get the older free version.

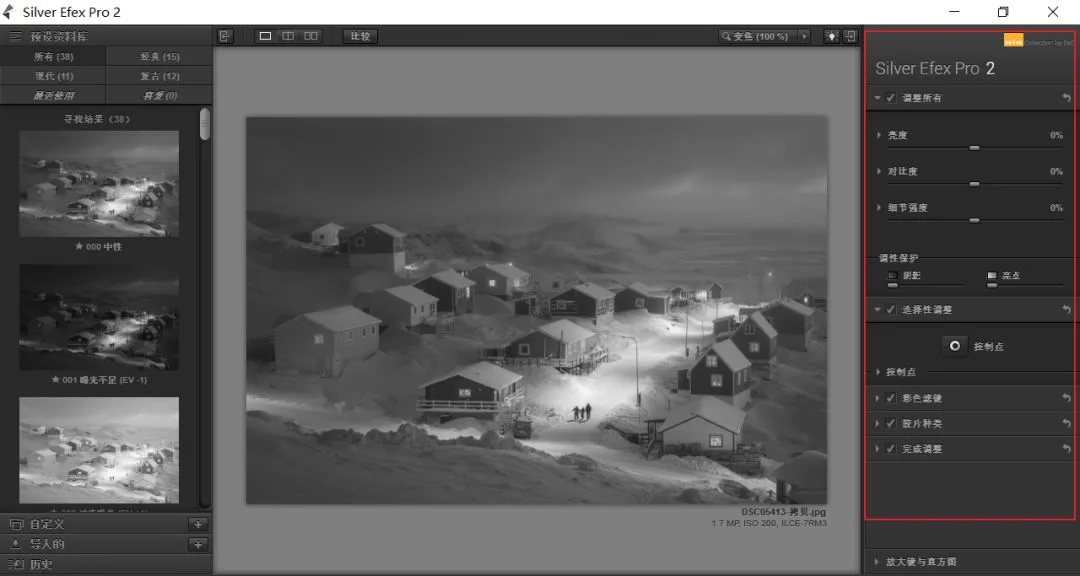
Nik Silver Efex is divided into a preset panel on the left, a preview panel in the center, and a parameter panel on the right. Today I'll explain in detail the two core black-and-white tonal tools in the parameter panel: "Global Adjustments" and "Selective Adjustments".
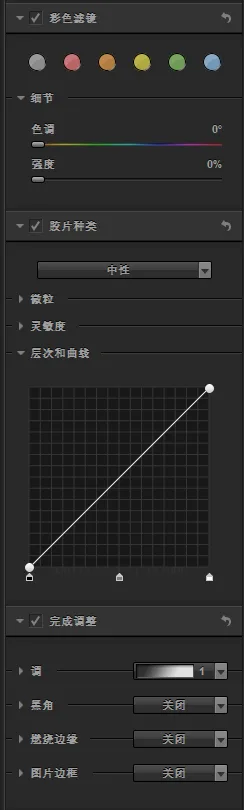
The "Color Filter", "Film Types", and "Finishing Adjustments" sections mostly handle simulation and vintage effects, which I'll cover in future Nik black-and-white tutorials.
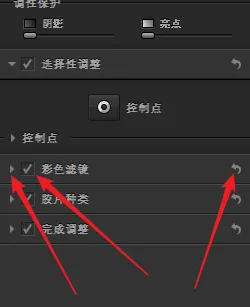
Note that each section's title bar includes three icons: a "triangle", a "checkbox", and an "undo arrow".
Clicking the leftmost "triangle" icon expands or collapses that section's adjustment sliders.
Clicking the "checkbox" icon applies or hides the current section's effect in the image.
Clicking the rightmost "undo arrow" icon resets that section's adjustments — all parameters in the section return to their defaults.
Expanding the "Global Adjustments" section reveals sliders for "Brightness", "Contrast", "Structure", and more.
Note that these parameters also have small "triangle" icons in front of them.
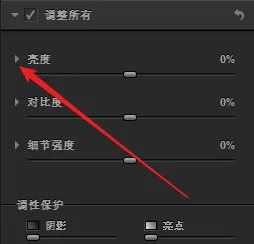
Clicking these "triangle" icons expands even finer, more advanced sub-sliders under each parameter.
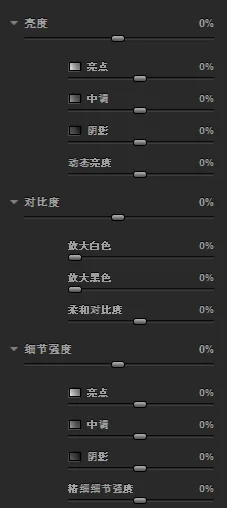
2
The "Global Adjustments" Section
The "Global Adjustments" section establishes the photo's overall tone by controlling global brightness, contrast, and structure.
The "Brightness" slider is simple: move left to darken the photo, right to brighten it.
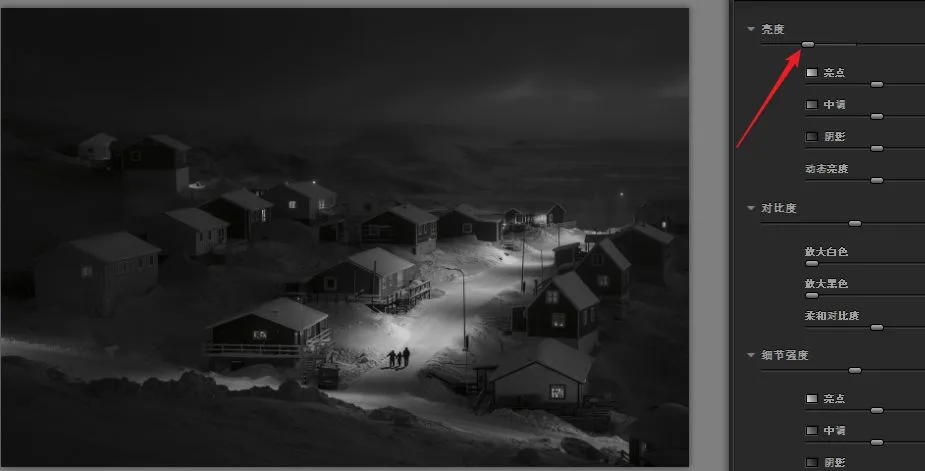
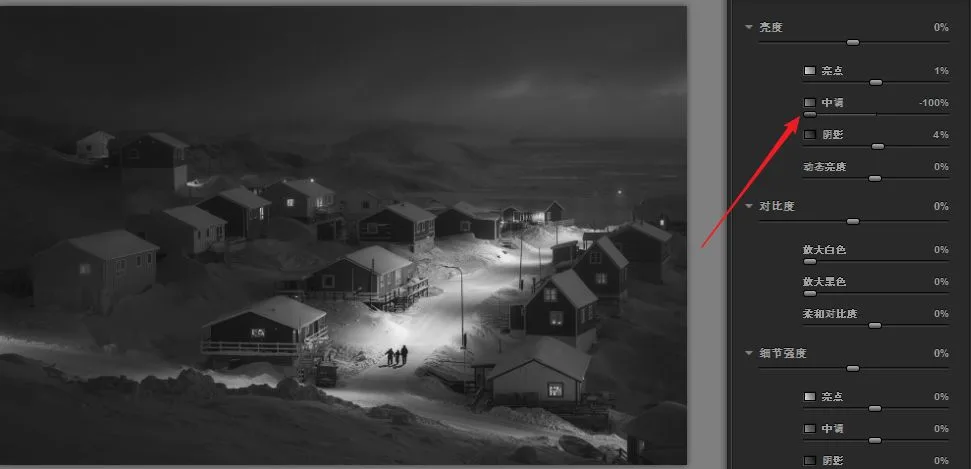
Under "Brightness" are three sub-sliders — "Highlights", "Midtones", and "Shadows" — controlling the bright, middle, and dark regions respectively.
For example, when I move the "Midtones" slider left, only the parts of the image that were originally middle brightness get darker; the existing highlights and shadows are barely affected.
"Brightness" also has a fourth sub-slider: "Dynamic Brightness". To understand it, let's first look at the shortcomings of plain "Brightness" adjustment.
When we move the "Brightness" slider, everything in the image brightens or darkens together, reducing overall contrast and making detail look less crisp.
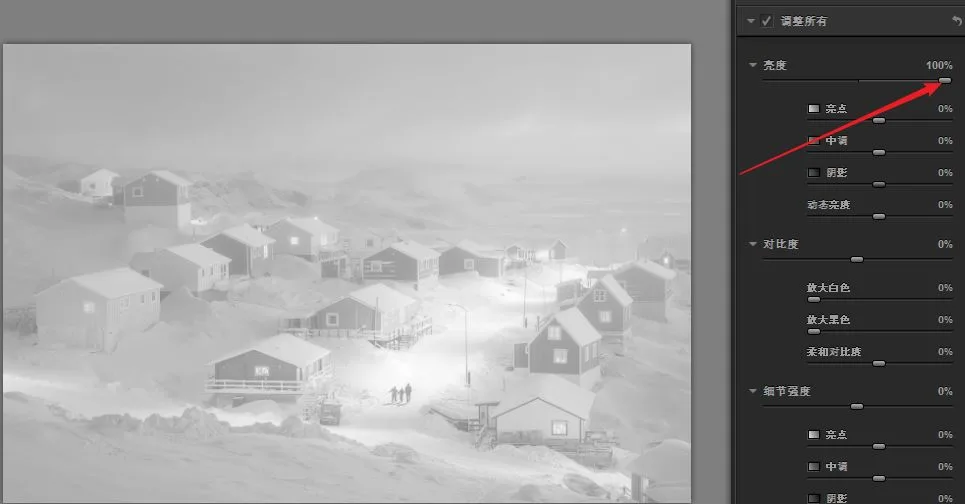
The "Dynamic Brightness" slider, by contrast, changes image brightness while preserving as much of the original contrast and detail as possible.
For example, when I move "Dynamic Brightness" right, the whole image brightens, but the dark regions brighten far less than they would with the "Brightness" slider. The image still has truly dark parts, so after the overall brightening it remains punchy and detailed.
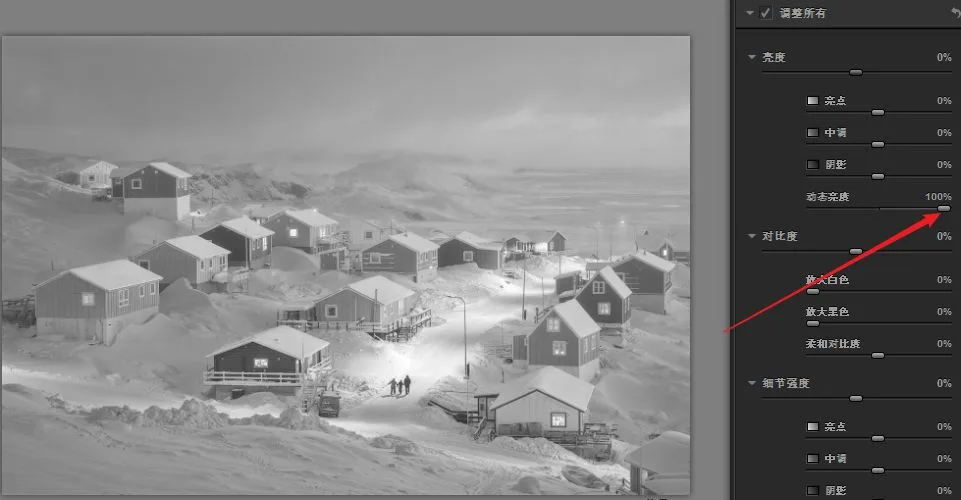
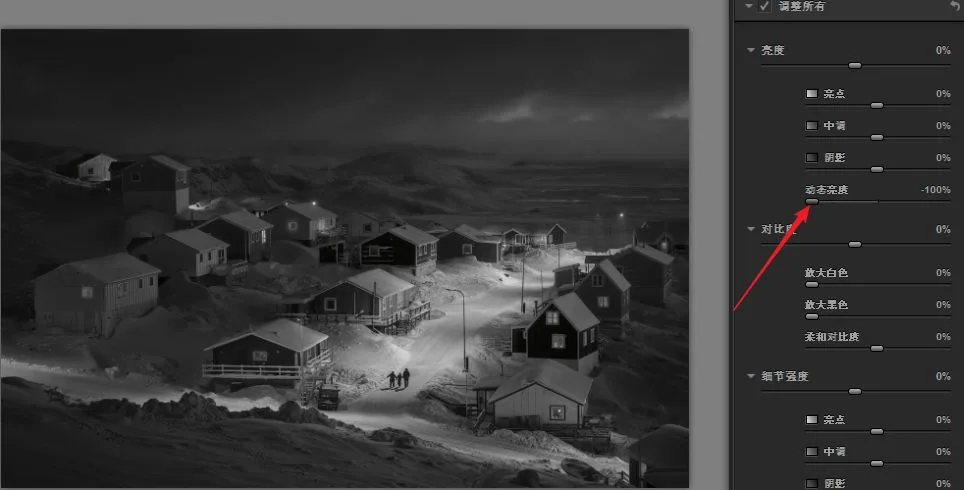
Likewise, moving "Dynamic Brightness" left darkens the image overall while well protecting the original highlights, so the photo keeps its contrast instead of collapsing into a black mass.
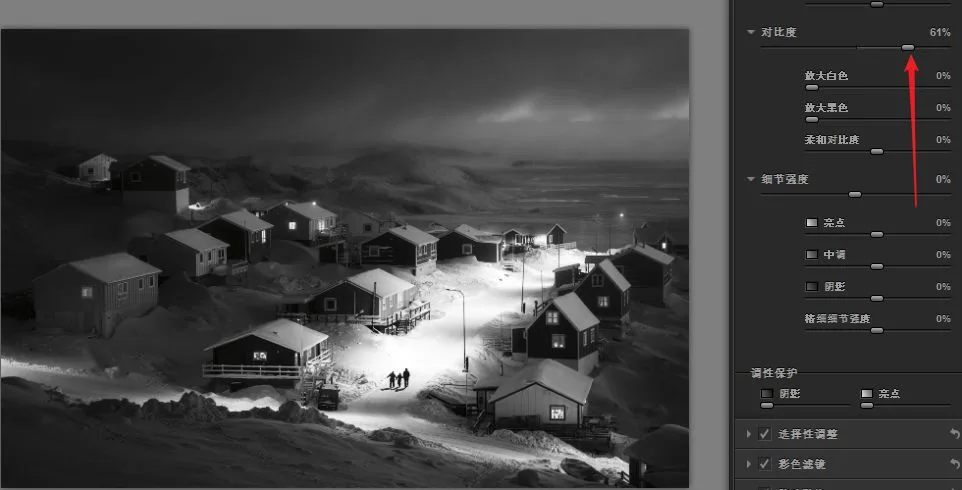
The "Contrast" slider controls the photo's overall tonal contrast.
Moving "Contrast" right makes the brights brighter and the darks darker, increasing punch. Moving it left reduces tonal contrast, making the image look "grayer".
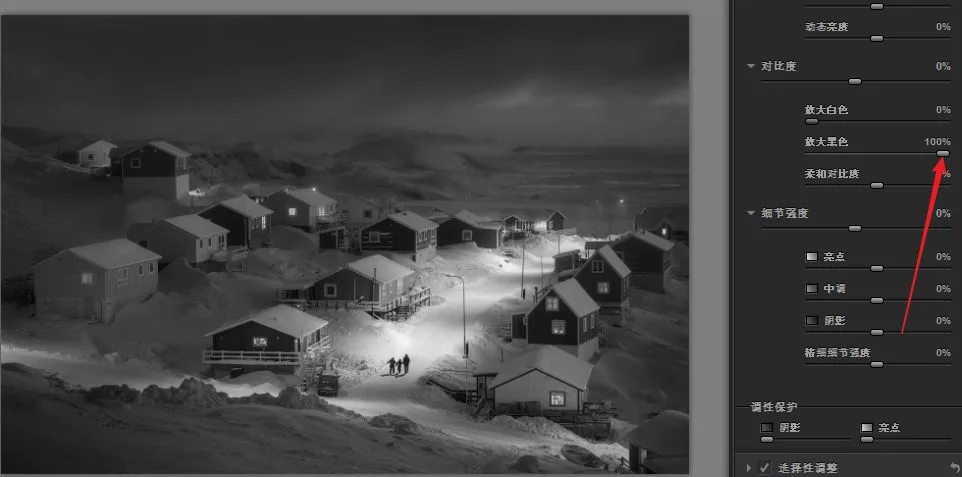
The next two sub-sliders, "Amplify Whites" and "Amplify Blacks", brighten and darken the photo in a very intelligent way.
Through a special algorithm, the "Amplify Whites" slider brightens regions of different original brightness by different amounts, guaranteeing two things while brightening: 1. Highlights won't blow out and lose detail. 2. Shadows won't be lifted so much that the photo loses contrast.
In most cases, Thomas finds that brightening with "Amplify Whites" feels more comfortable than using the "Brightness", "Midtones", or "Dynamic Brightness" sliders.
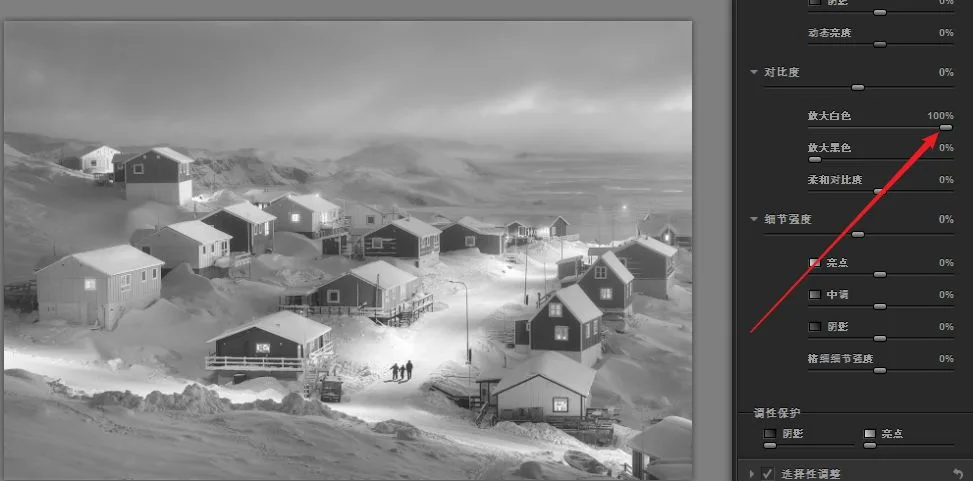
The "Amplify Blacks" slider works the same way in reverse: moving it right darkens the photo while protecting shadow detail and overall contrast — very smart and useful. It should be your first choice for darkening a photo.
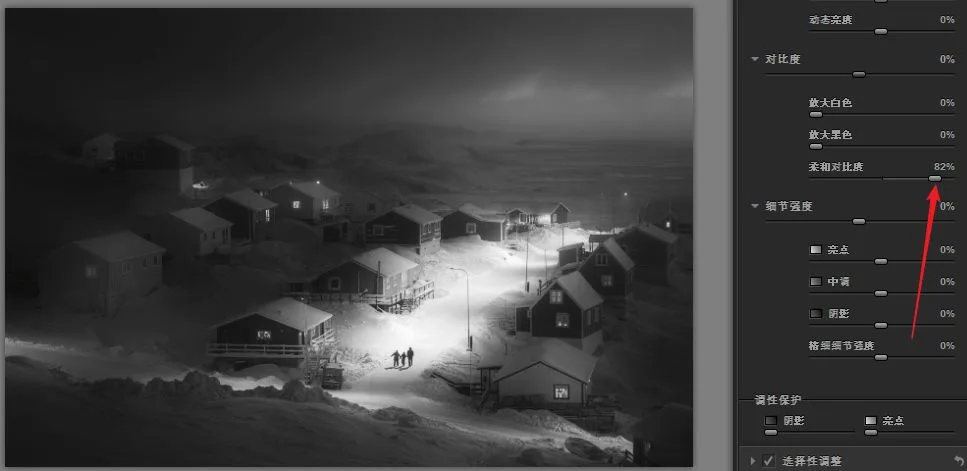
Finally there is a "Soft Contrast" slider. Its algorithm is special: it identifies the bright and dark regions of the image and, at the boundaries between them, softens the originally harsh edges to produce a gentle tonal transition.
For example, moving "Soft Contrast" right brightens the brights and darkens the darks while also applying a degree of softening.
In the image below, the light-dark boundary is no longer a hard edge but a very soft gradient from bright to dark.
Next comes the "Structure" slider, similar to "Clarity" in Camera Raw. Moving "Structure" right makes detail in the image clearer.
Of course, overusing it makes the image look dirty.
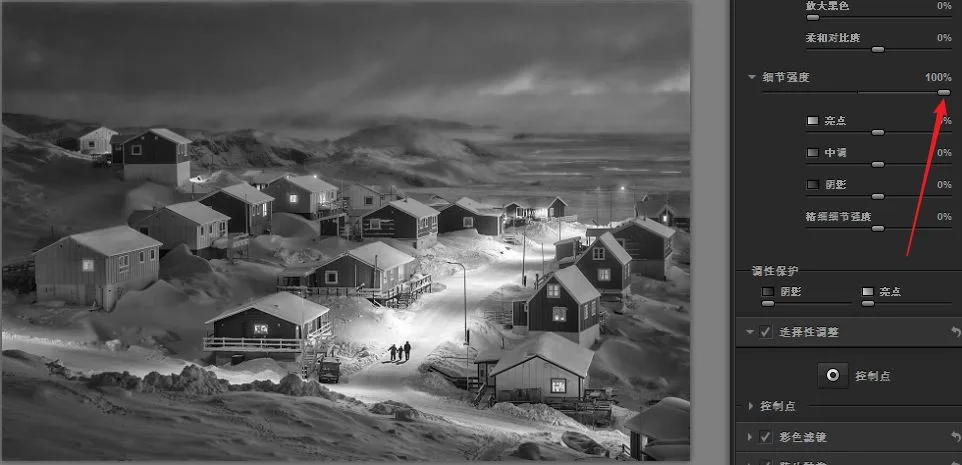
Moving "Structure" left makes detail hazier and blurrier, producing a softening effect.
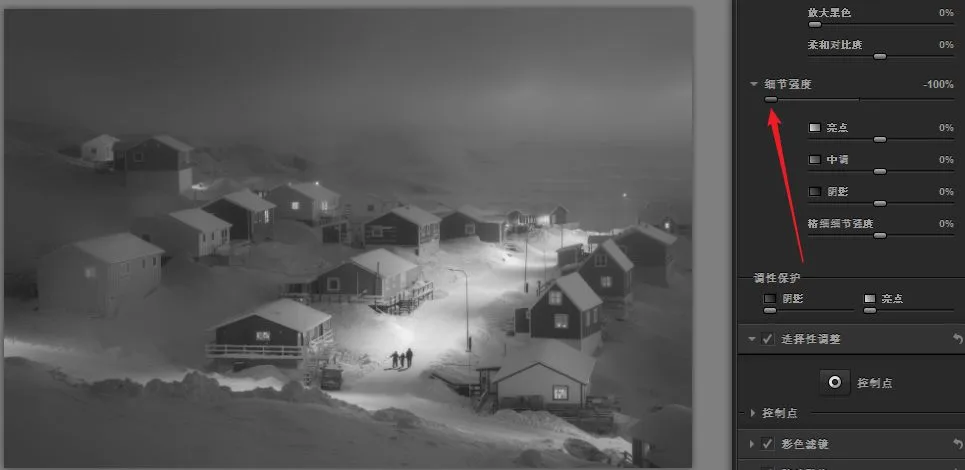
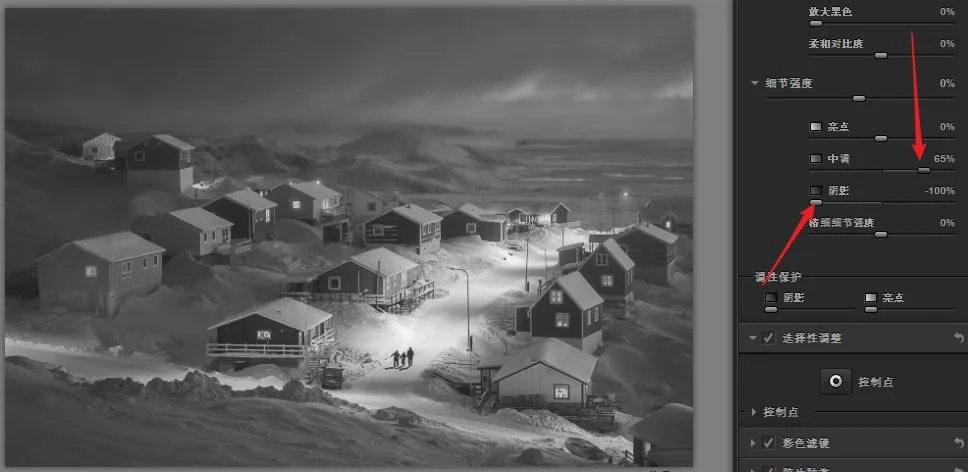
Under "Structure" there are also three sub-sliders — "Highlights", "Midtones", and "Shadows" — so we can precisely control the clarity of detail in the bright, middle, and dark areas respectively.
In the example below, I moved the "Shadows" slider left to reduce clarity in the dark areas, making them look softer and less dirty.
At the same time, I moved the "Midtones" slider right to increase midtone clarity, counterbalancing the shadow softening.
The combined effect of these two steps: the dark areas are softer, yet the image doesn't look mushy — the midtones remain very crisp.
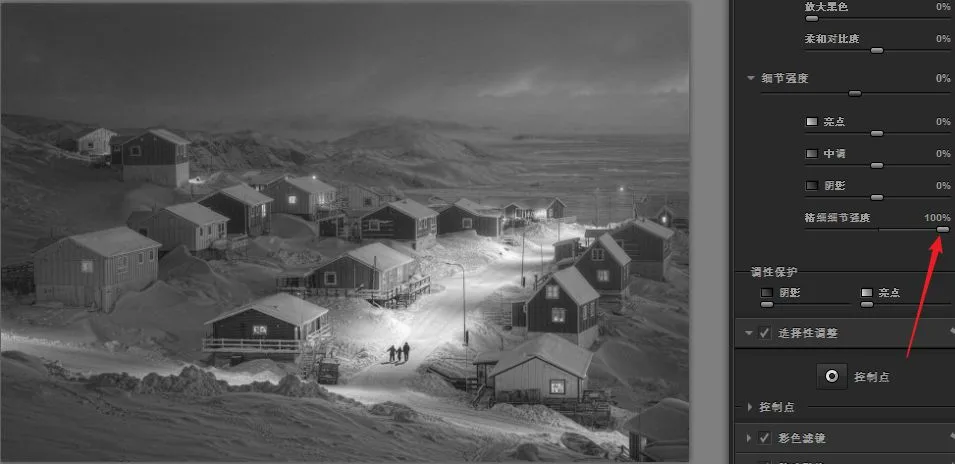
"Structure" also has a fourth sub-slider: "Fine Structure".
"Structure" controls the larger details and edges in the image, such as houses, mountains, and clouds.
"Fine Structure" controls smaller textures, such as the texture of snow or the wood planks of a house.
Moving "Fine Structure" right, you can see the large edges are not strengthened, but small details like the pitted texture of the snow are enhanced.
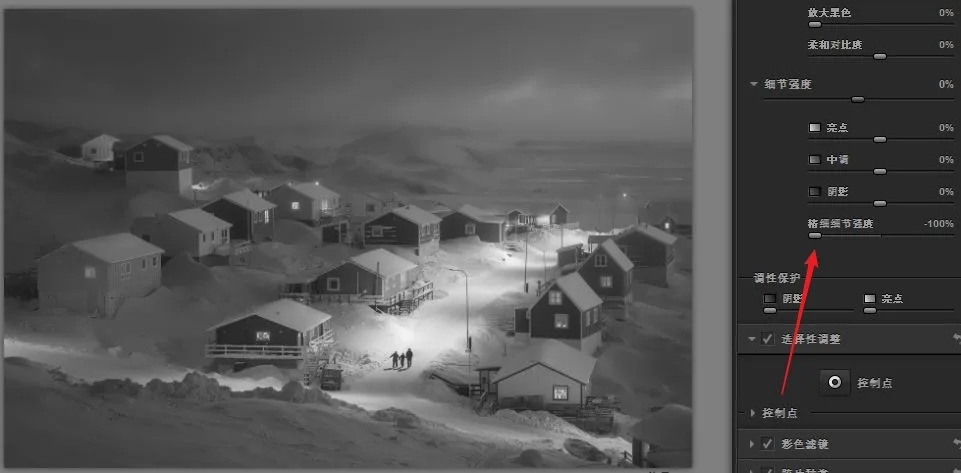
Likewise, moving "Fine Structure" left weakens only the small textures while larger edges and details are well preserved.
For many black-and-white photos that look dirty, reducing "Fine Structure" makes cluttered micro-detail disappear while protecting the large edges, so the photo doesn't go soft overall.
At the bottom of "Global Adjustments" is "Protect Tones", with "Shadows" and "Highlights" sliders that protect the image from severe over- or underexposure.
In the example below, I pushed contrast and structure way up, creating lots of pure black and pure white areas that look unpleasant.
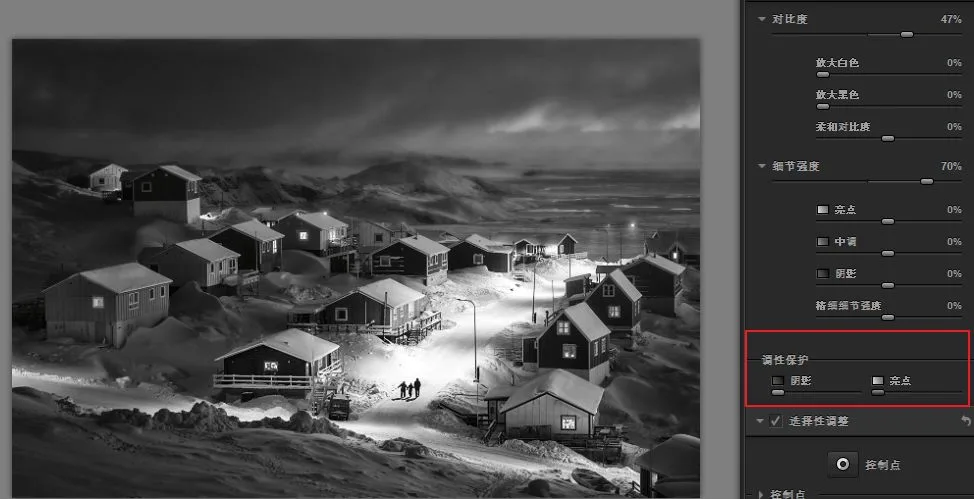
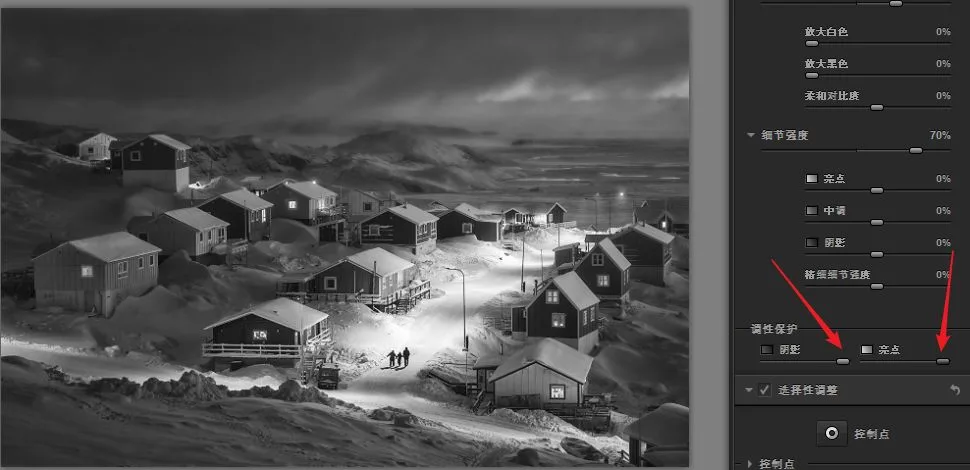
Moving the "Shadows" slider under "Protect Tones" to the right keeps the shadows from going too black.
Moving the "Highlights" slider right keeps the bright areas from going too white.
3
The "Selective Adjustments" Section
The sliders in "Global Adjustments" all affect the entire photo.
If I only want to adjust one local area or object — a mountain, a house, a cloud — I need the "Control Points" in "Selective Adjustments".
Click the "Control Points" icon in the "Selective Adjustments" section, shown by arrow 1 below. Then click an object in the image to create a control point there.
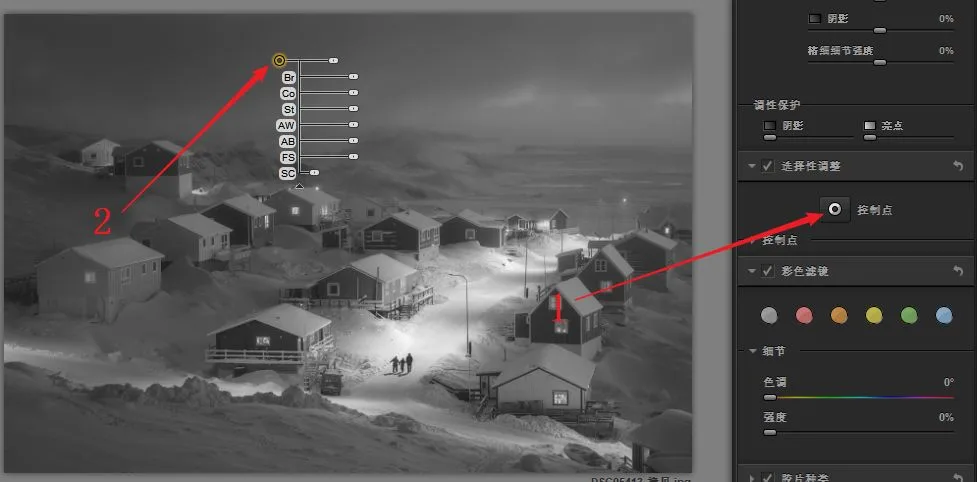
Control points are a core tool in Nik plugins: based on color, texture, and brightness, they intelligently detect the boundary of the object they sit on, quickly generating a fairly precise mask.
On the right side of the control point list are checkboxes. When I tick the checkbox to the right of "Control Point 1", the preview shows the mask corresponding to the control point we just created.
White areas of the mask fully apply all of "Control Point 1"'s adjustments. Black areas apply none of them. Gray areas apply part of the adjustments at the corresponding opacity.
As you can see, the mask for "Control Point 1" is not a regular circle — it covers all areas near the control point's center that are similar in texture and color.
Since the center of "Control Point 1" is on a cloud, nearby clouds and snow with similar texture and color are white or gray in the mask and will be affected by the control point.
The houses, whose texture and color clearly differ from the cloud at the center, are black in the mask and won't be affected.
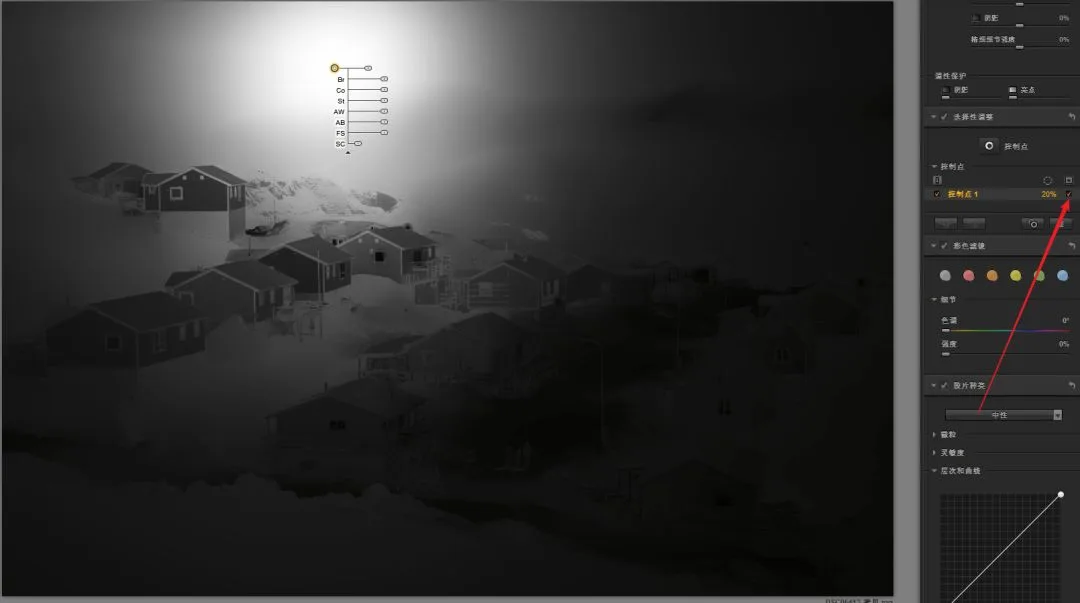
If I move the center of "Control Point 1" onto a house, its mask affects almost only that house. It's not yet 100% accurate, but we can improve mask precision by adding more control points — I'll explain in detail later.
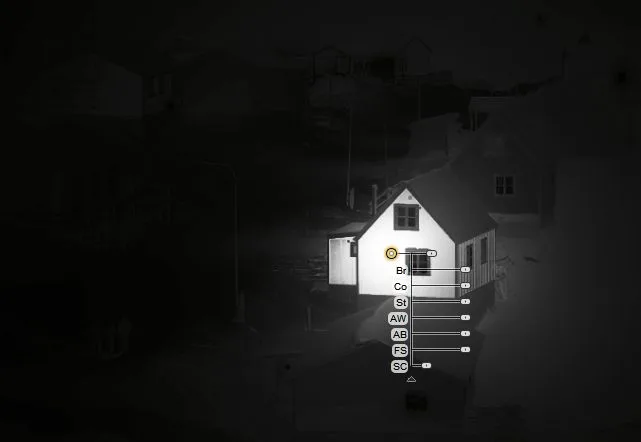
Each control point has eight adjustable sliders.
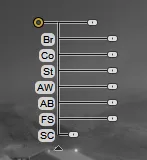
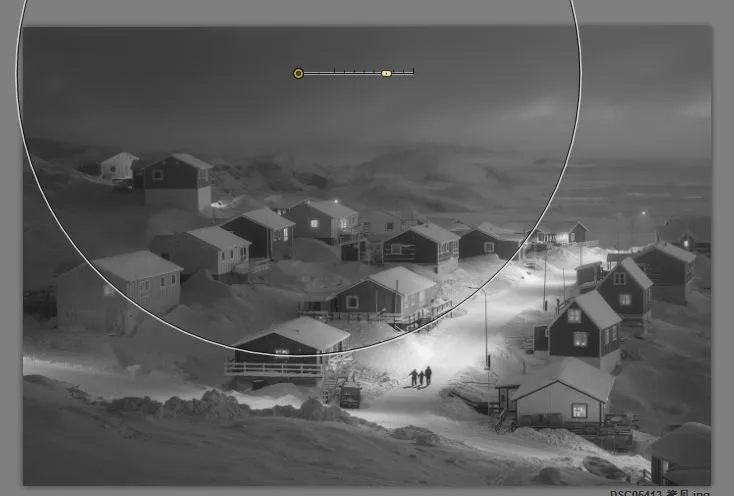
The first is the radius slider, which determines the control point's range of influence.
Note that although this range is shown as a circle, the circle is only a rough illustration. The area the control point truly affects is the places inside and near the circle that are similar in color and texture to its center.
Sliders 2 through 7 are the same-named functions from "Global Adjustments".
"Br" stands for Brightness.
"Co" stands for Contrast.
"St" stands for Structure.
"AW" stands for Amplify Whites.
"AB" stands for Amplify Blacks.
"FS" stands for Fine Structure.
These sliders work exactly like their same-named counterparts in "Global Adjustments", except they now only affect the area influenced by this control point.
Earlier I created "Control Point 1" with its center on a cloud.
First I moved the "Radius" slider right to expand the affected area. Then I lowered "Brightness" and raised "Structure" to make the clouds look more dramatic.
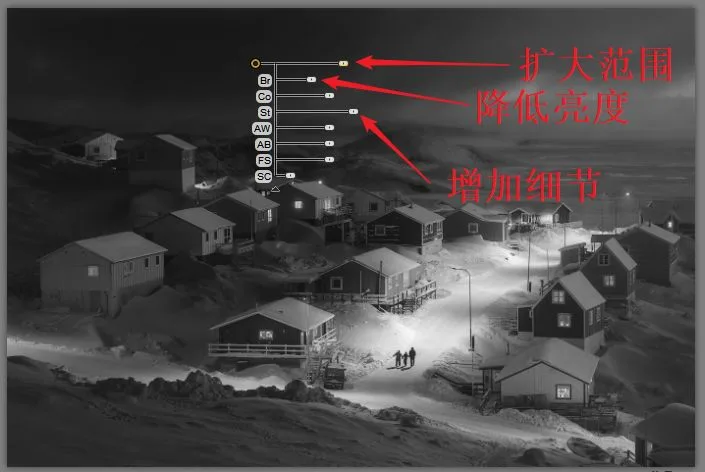
"Control Point 1" only affected the clouds on the left of the frame. To give the other clouds the same treatment...
...I can hold the Alt key and drag the center of "Control Point 1". This duplicates control points with identical parameters but different centers.
In the image below, I duplicated "Control Point 1" three times, placing copies on the left, middle-right, and right clouds.
Now the entire cloud layer is darker and more detailed.
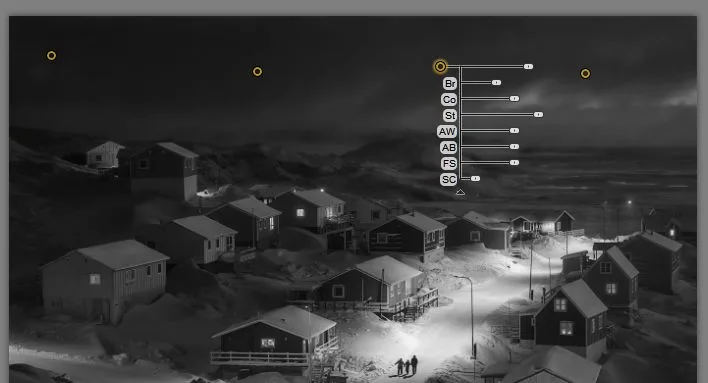
But there's still a problem: the texture of the snowy ground is fairly similar to the clouds. The darkening affected not only the clouds in the sky but also the snow on the ground.
We can improve precision by adding more control points.
Because control point ranges are mutually exclusive: once a spot is claimed by "Control Point 2", it is no longer affected by "Control Point 1".
Suppose a spot is snow. Because its texture is close to the clouds at "Control Point 1"'s center and it lies within that point's radius, it falls under "Control Point 1".
If I create a new "Control Point 2" on that snow or nearby, that spot is now closer to "Control Point 2" in both texture and distance. It will be governed by "Control Point 2" and no longer affected by "Control Point 1".
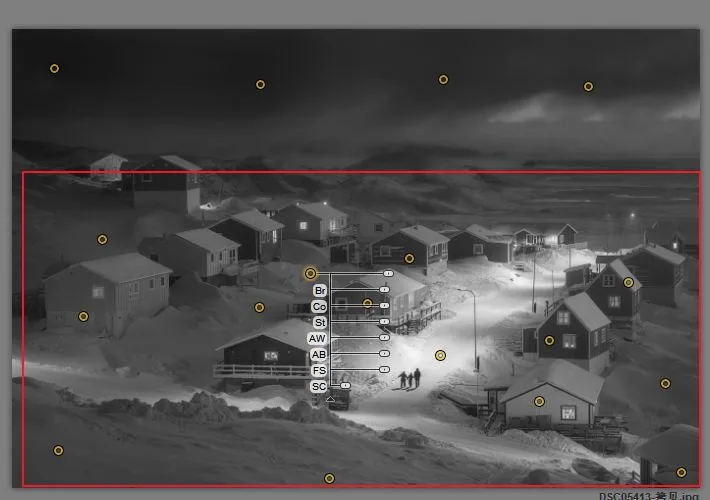
In the example above, you can see I created many new control points on the snowy ground. The ground snow is now governed by these new points and no longer affected by the sky control points.
Since my new control points all use default parameters with no adjustments, the snowy ground returns to its original state, while the clouds remain darkened — and the darkening now applies with greater precision.
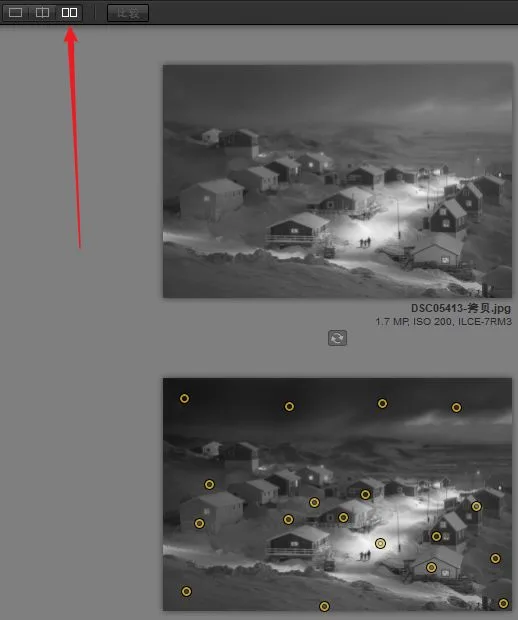
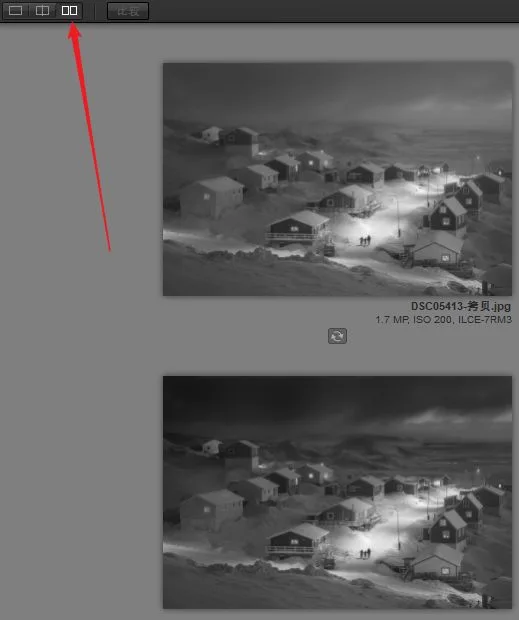
We can click the third icon in the upper-left of the preview — two adjacent rectangles — which is "Side-by-Side Preview".
This preview mode places the before image on top and the after image below.
In the example above, we used control points to precisely darken the clouds while the ground was essentially unaffected.
Among the eight control point sliders, the last is "SC", Selective Color.
Moving this slider right restores a degree of color in the control point's affected area. The farther right, the more color returns.
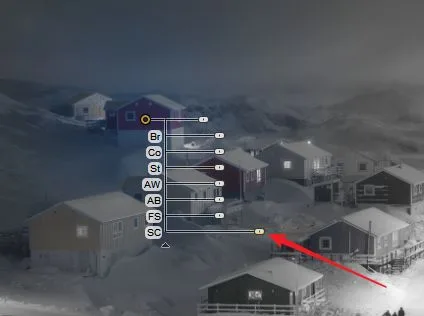
For example, I placed a control point on the purple house and moved "SC" right — only the area around the purple house regained color. The control point wasn't precise enough yet, though: the neighboring house and snow also regained color.
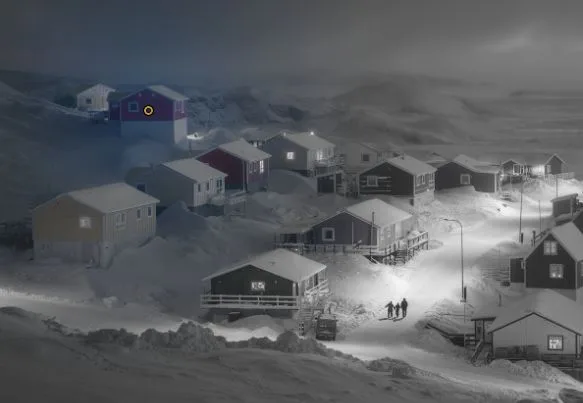
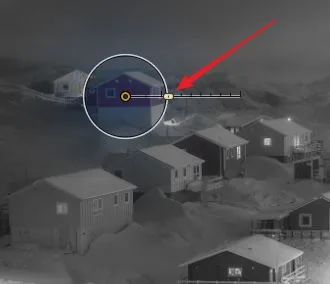
First, I can move the control point's "Radius" slider left to shrink its range.
Next, I can create new control points on the surrounding snow and houses, all with default parameters.
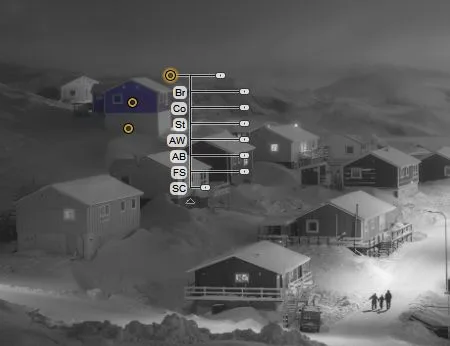
After these two steps, the control point on the purple house only affects the purple house's area. The purple house precisely regains its color while everything else stays black-and-white.
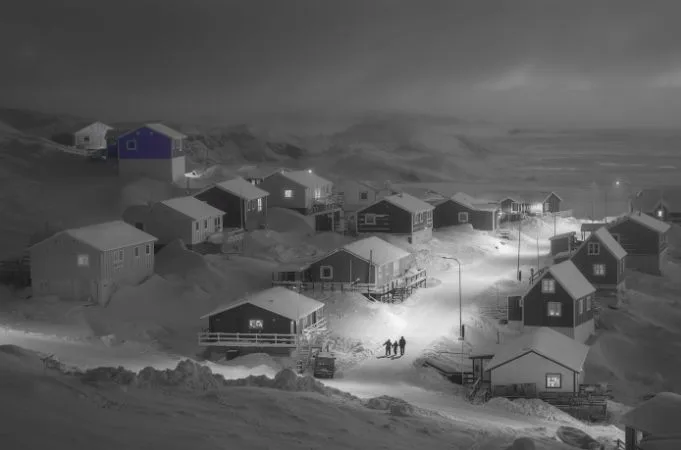
With the control points in "Selective Adjustments", we can quickly and finely tune the brightness, clarity, and color of any object in the frame.
That covers the two most important sections of black-and-white post-processing: "Global Adjustments" and "Selective Adjustments".
I'll cover the "Color Filter", "Film Types", and "Finishing Adjustments" sections below the parameter panel in future tutorials.
Thanks for following along!