Photography Tutorial · 2016-06-12
PS Curves (Part 2): Film Looks, Dark Tones, Bleach Effects and More
If the histogram is the photographer's 'X-ray', then the Curves tool must be the photographer's 'scalpel'.
Last Sunday's 'Curves (Part 1)' covered the three basic curve shapes — darken/brighten, black-white point, contrast — and how to apply them locally. This week Thomas continues with how to flexibly combine these basics into rich, varied tonal effects.

Three basic curves and local application
A curve with the anchor placed in the middle and lifted we call a brighten curve; pressed down, a darken curve. Brighten/darken curves conveniently lighten or darken a photo.
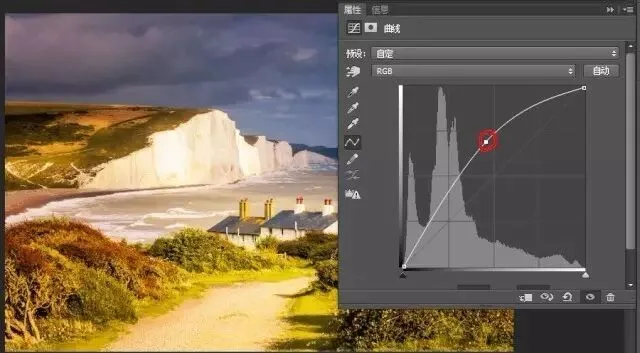
We call the darkest point of a photo the black point and the brightest the white point; the difference between them determines the photo's contrast.
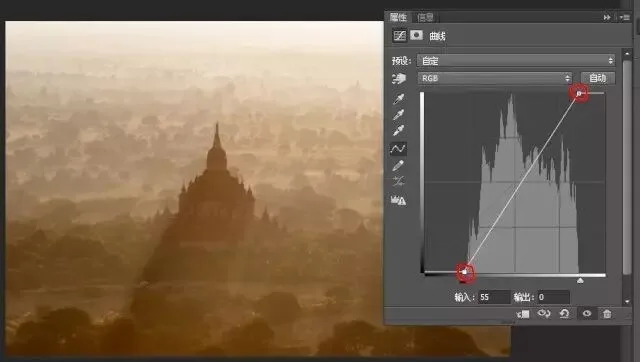
By shifting the curve's two endpoints horizontally or vertically we change the black-white points — we define this shape as the black-white-point curve.
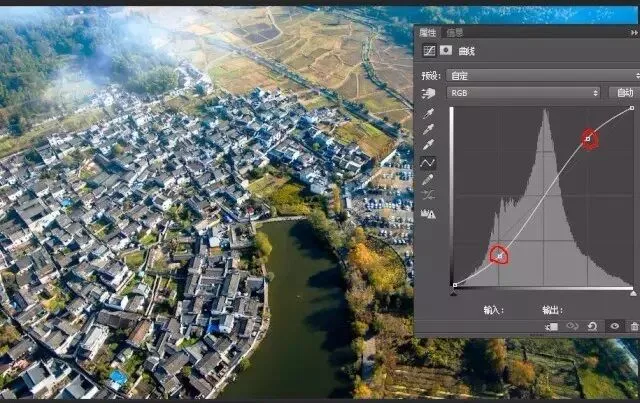
The contrast-increasing curve (S-curve) is an anchor raised in the highlights and an anchor lowered in the shadows, shaped like the letter S. Similarly, an inverse-S shape is the contrast-reducing curve.
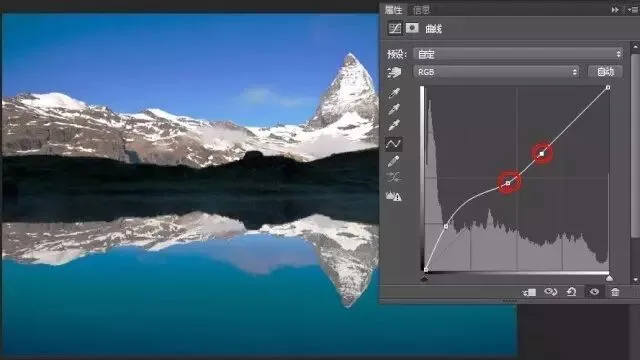
When using these 3 curve types, we can add 1-2 anchors to pull unaffected regions back into place, so the curve acts only locally. That's local curve application.
Learning the three basic curves is like learning arithmetic — knowing 1+2=3. Learning local application is like learning parentheses in arithmetic.
Once we know basic arithmetic and parentheses, with a little combination we can understand complex equations like ((3+4*9/6)-7)+(4-2)*8 = 18.
Likewise, though the three basic curves look simple, combining them creates rich and complex effects.
Film-look curves
Below is a photo of Thailand's Maeklong Railway Market. How do we make it more film-like?
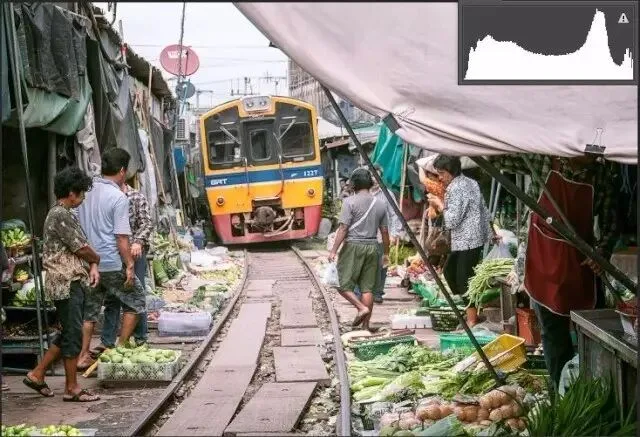
The simplest way is applying PS's Color Lookup (3D-LUT) tool — preset film LUTs quickly give different film tonalities and colors. But these effects can actually be done with curves too.
Look closely at the result below with the Kodak 5218 film LUT: the histogram keeps contrast while shifting noticeably right, with zero pixels in the Blacks. The grayish shadows give an illusion of rich shadow detail — as if shot on high-latitude film.
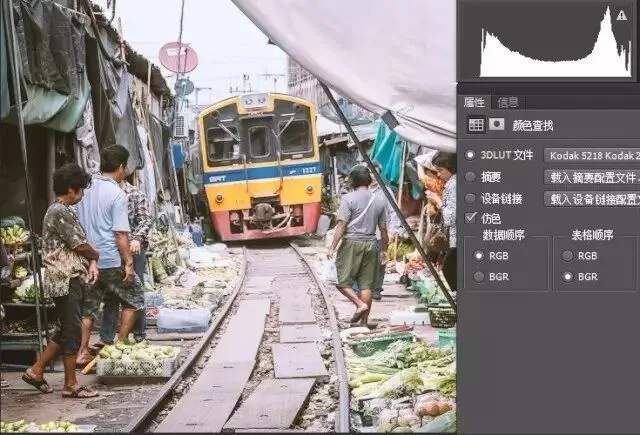
Eliminating the black pixels is simple: use the black-white-point curve we learned, and raise the black-point anchor (straight up).
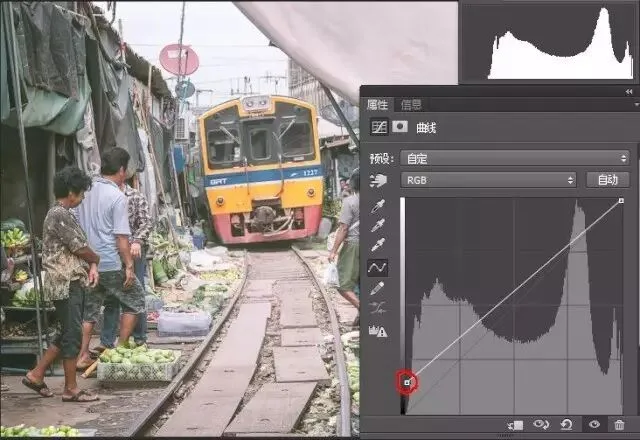
But then not only the shadows go gray — midtones and highlights gray out too. So to restore contrast, I add an S-curve (contrast-increasing) on top. The photo gains a film-like tonality: grayish shadows yet ample contrast.
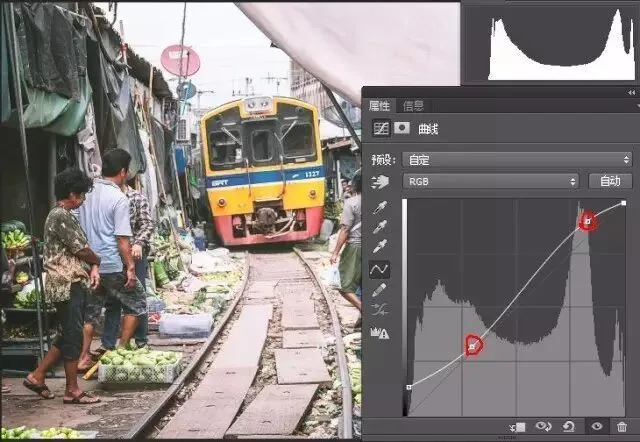
We can then continue with Selective Color, Gradient Map, Hue/Saturation and other grading tools to add film color — these color tools will be covered in future tutorials.

Here, film curve = raise-black-point curve + contrast-increasing curve. We don't need to memorize this formula — some film looks actually need reduced contrast. Once you understand the three basic shapes, you can combine them into all kinds of effects.
Dark-mood curves
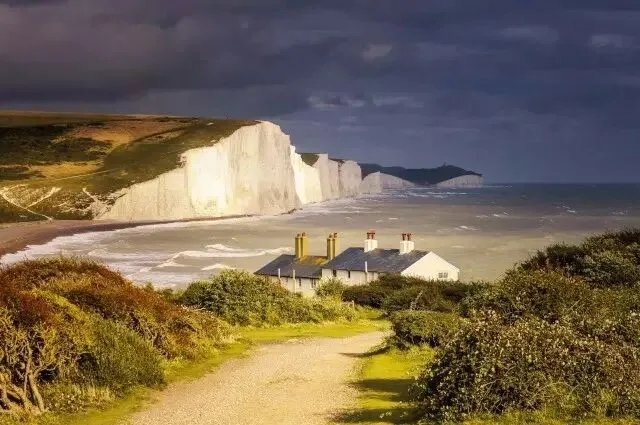
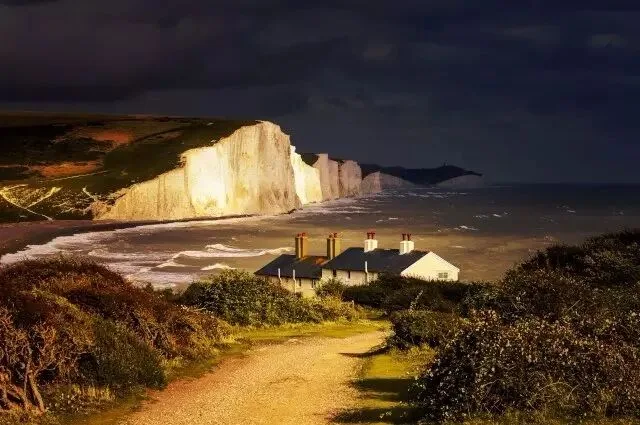
Below is a photo of the Seven Sisters cliffs in England. How do we make it gloomier, like the end of the world?
Applying the darken curve directly, the midtones already reach the somber tonality we want.
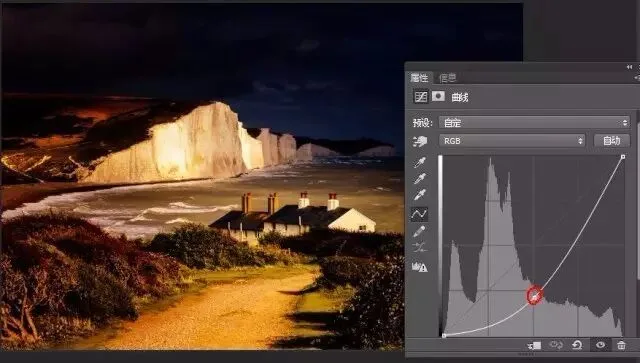
But now the dark areas are almost pitch black, detail lost. So I add an anchor in the darks and pull up — equivalent to locally applying a brighten curve in the shadows.
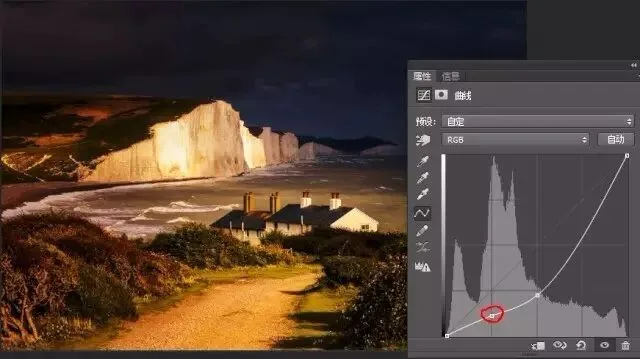
Shadow detail is back, but the shadows look severely gray and the dark clouds have lost all dimension. So I add 2 more anchors in the darks, overlaying an S-curve to raise shadow contrast — the layered contrast inside the clouds reappears.
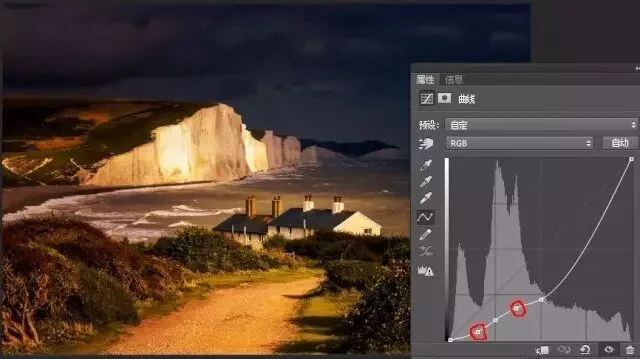
Finally I add an anchor in the highlights and pull up — a local brighten curve over the highlights, restoring their brightness.
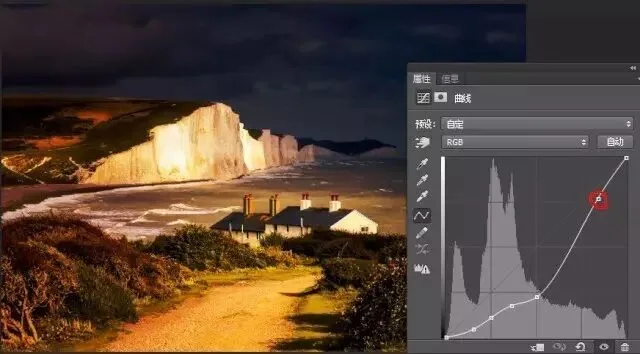
This dark photo's final curve = global darken curve + shadow brighten curve + shadow contrast curve + highlight brighten curve. Looks complex, but once you understand the principle it's simple — just the three basic curves stacked step by step.
Crushed-black & bleach curves
The crushed-black/bleach look suits sports, tough subjects and emotionally intense images. As shown below, it features large pure-black or pure-white areas with strong contrast.
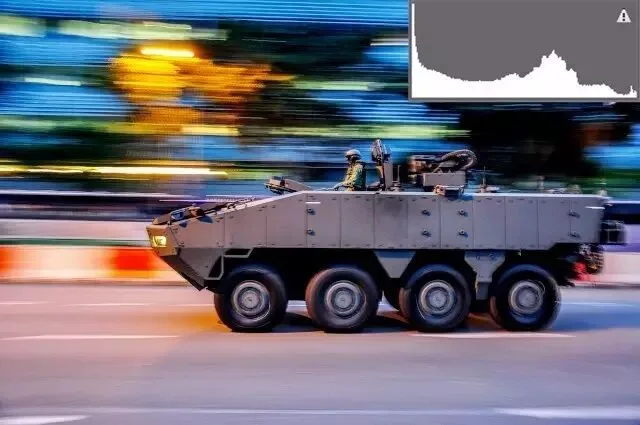
Below is the original shot of an armored vehicle speeding down a road — not contrasty enough to convey the impact of an armored warrior.
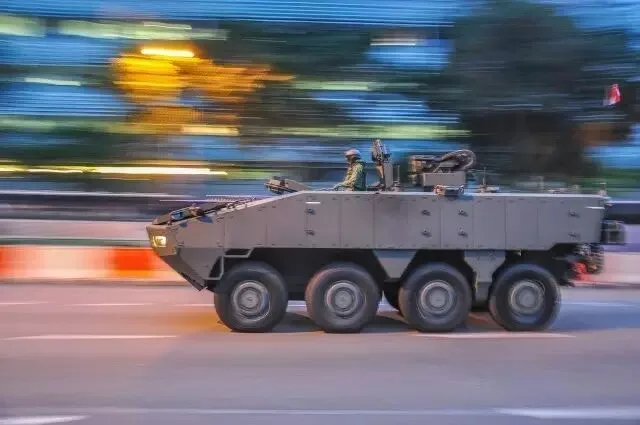
Using the black-white-point curve, I move the black-point anchor right — all very dark parts become pure black. Blacks are sufficient now, but the side effect is the whole image gets crushed dark.
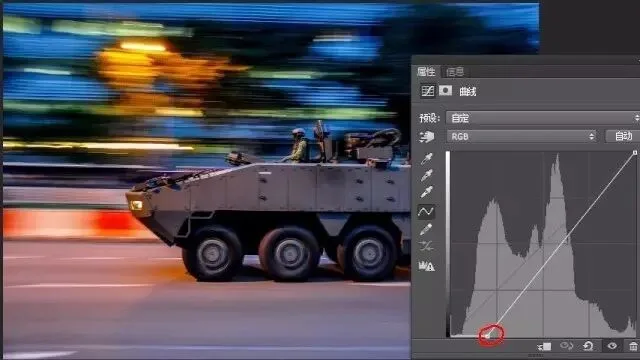
So I create anchors in the bright areas and use a brighten curve to lift highlights and midtones, creating a hard contrast. This effect — expanded pure blacks with brightened brights — is called crushed black.
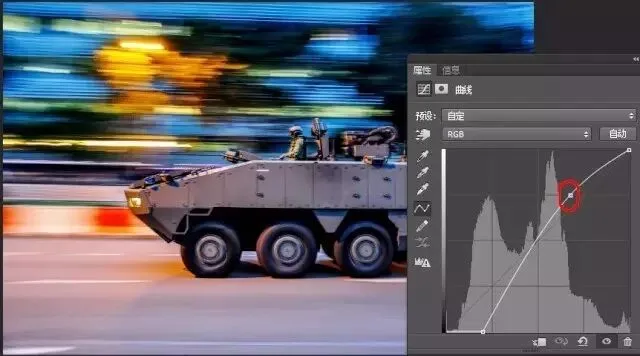
Similar to crushed black is the bleach effect. As the name suggests: the photo is brightened overall, whites blow out, and darks brighten into compressed deep gray — as if the photo were printed on paper and soaked in bleach.
Below is kayaker Thomas, shot on a GoPro.

The bleach curve's first two steps match the crushed-black curve: turn the darks pure black while brightening the photo.
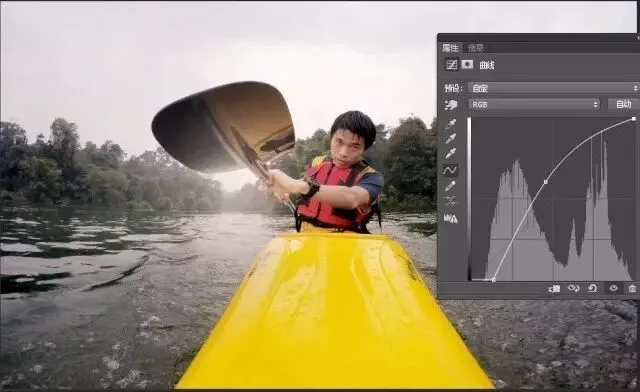
Bleach goes further — highlights also blow out to white. Detail is lost, but the photo gains a bright, dynamic mood. In curves this is done by moving the white-point anchor left.
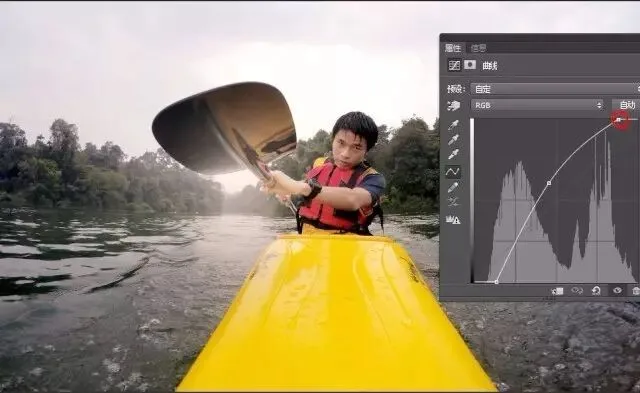
Finally, move the black-point up a bit — the darks just compressed to pure black are lifted into a uniform deep gray.

You can see the bleach curve is also a combination of the black-white-point curve and brighten curve — truly, all variations spring from the same root!
Weekly summary
Whether film curves, dark-mood curves, or crushed-black/bleach curves — however complex the effect — their essence is still the 3 basic curves (brighten/darken, black-white point, contrast) combined globally and locally!
So there's no need to memorize what these complex curves look like. Once you understand what the three basic shapes do, you can combine whatever tonal effect you want!
(PS curves can adjust not only tonality; the individual color-channel curves also affect color tone — that will have to wait for future tutorials.)
I'm @Thomas Chu Photo — every Sunday evening I share an original piece of photography know-how.
Notice: starting next Friday, Thomas will be trekking in the mountains of Pakistan for a month with no internet or signal. The next Sunday photography share will be postponed to July 17. Thanks for following!