Photography Tutorial · 2020-08-02
Great Shots at ISO 70,000? This Noise Reduction Tech Is Incredible
Thomas Chu Photo
This is a professional tutorial on high-ISO noise reduction, written by renowned wildlife photographer Jeff.
Once you master this workflow, even photos shot above ISO 10,000 can be effectively denoised. This article runs nearly 11,000 words — share and bookmark it first!
Wildlife photography, sports photography, documentary photography — and many wedding photographers shooting indoor low-light ceremonies — all have no choice but to shoot at very high ISO.
Take wildlife photography: most wild animals are most active in the half hour around sunrise and sunset. Especially for a fully nocturnal cat like the leopard, shooting time is always in low light, and it likes to lurk in the bushes — so the shooting environment is always very dark.
To capture high-speed action like hunting and fighting, we need at least 1/1600s or faster to freeze the animals' movement, and F5.6, F8, or smaller apertures for enough depth of field so that two subjects on different focal planes both stay sharp. The only way to get enough sensitivity is to raise the ISO.
My exposure settings for wildlife: Manual mode, shutter 1/1600s or faster, aperture F5.6 or smaller, Auto ISO with no upper limit. ISO often exceeds 10,000 and the images are riddled with noise, so I developed a shooting and post-processing workflow for high-ISO images — the "Jeff Workflow" — to bring these noisy files up to a usable standard.
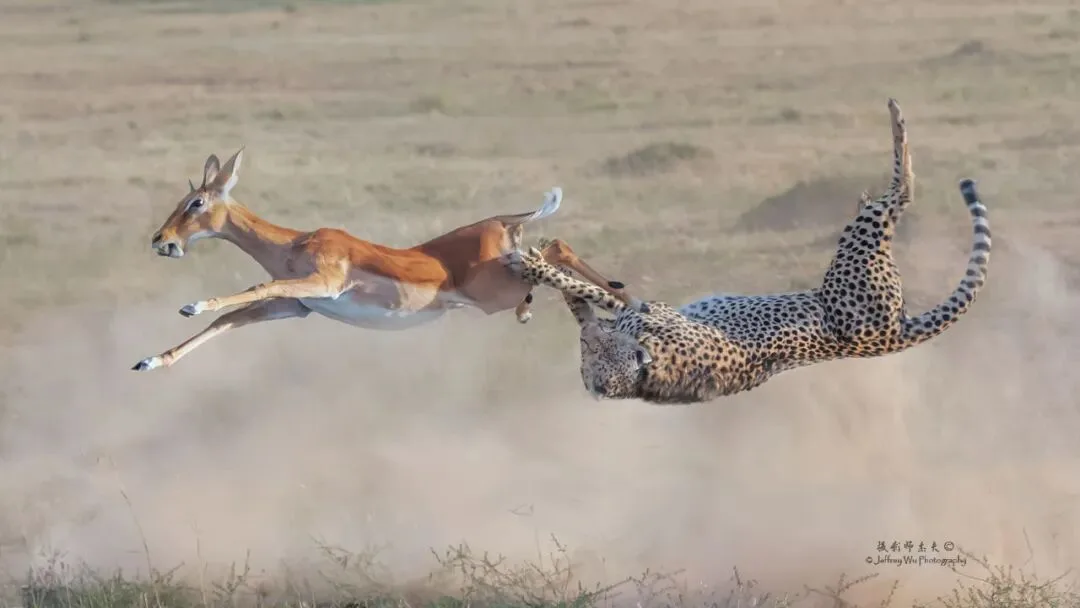
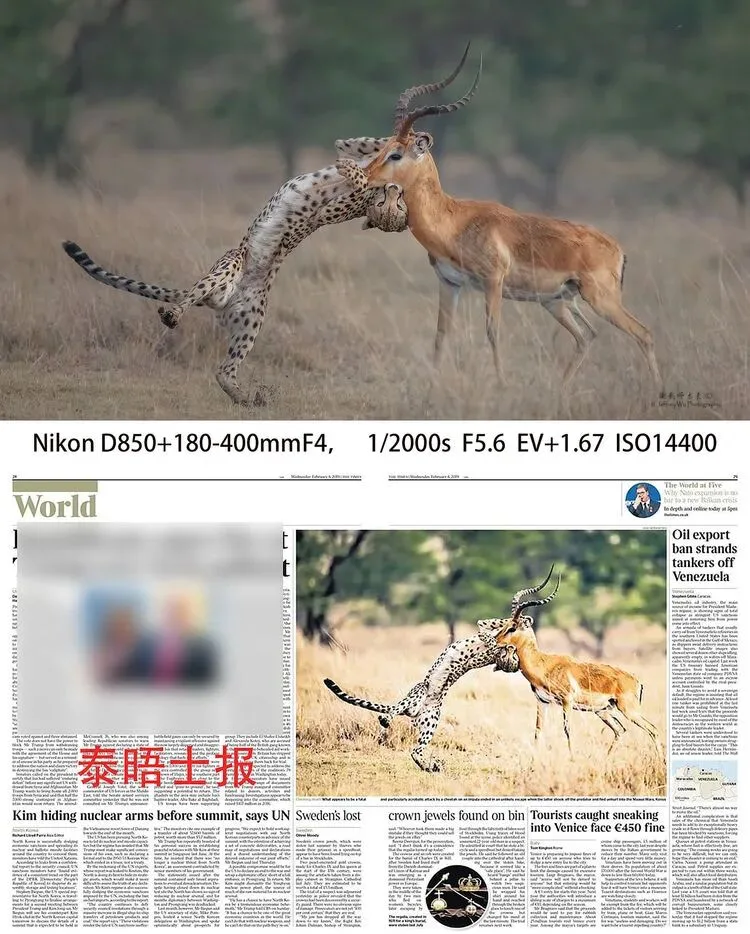
For example, this cheetah hunt I shot in the Maasai Mara in 2018 took place in the woods at sundown, when the light was already very dim. This photo was shot at ISO 14,400; processed with the "Jeff Workflow," it met professional standards and was published in The Times (UK) on February 6, 2019:
1. Why Update the "Jeff Workflow"
Six years have passed since I published "The Jeff Workflow — Noise Control for High-ISO, High-Speed Photography" in 2014. In those six years, the workflow has spread over 500,000 times across photography websites, my books, and my teaching videos, and I've received much feedback from photographers it has helped. I'm glad it has helped so many — that was the main reason I put it online in the first place.
A post-processing workflow is a tool to help perfect a photographer's work, and such tools inevitably become outdated in an era of rapid technological development. The Jeff Workflow's core concept — using "expose to the right" to record as much image detail as possible, then removing noise in software while preserving quality — has not changed, because it is dictated by the physical properties of how digital sensors record data.
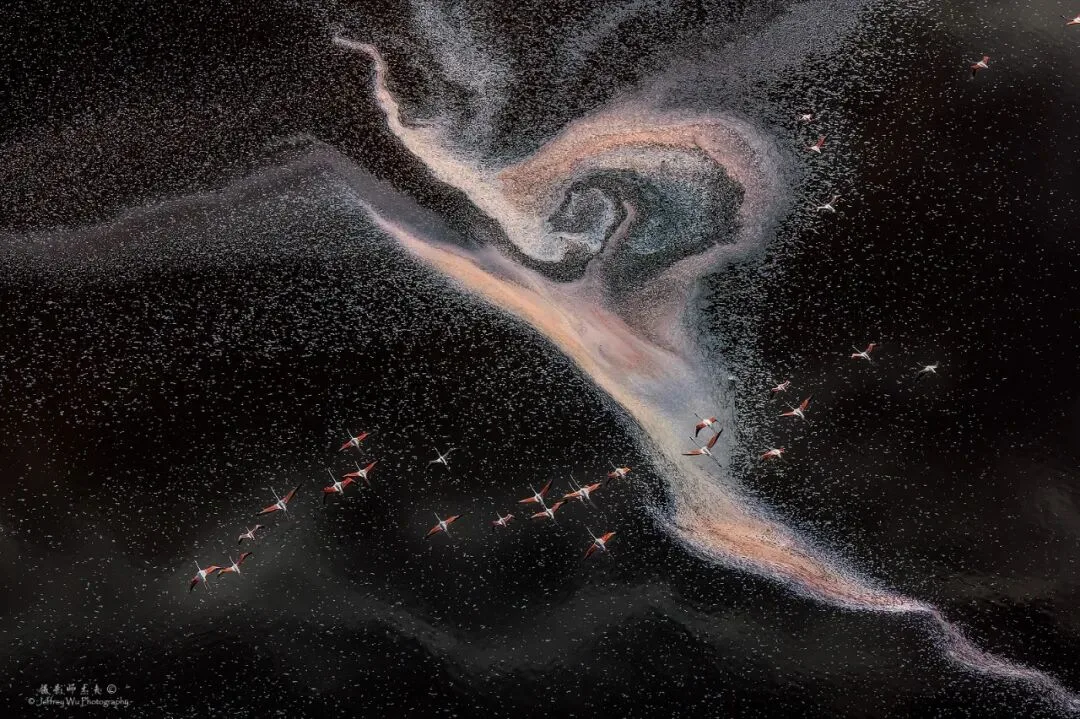
Over these six years, noise-reduction software has kept improving. But because noise pixels inevitably occupy and degrade the actual texture pixels, all such software improvements have been about distinguishing those pixels more precisely — there has been no fundamental technical breakthrough.
Because I use the Jeff Workflow, I've kept watching for and trying new denoise software. Over the years I've used:
Noiseware
Skylum Luminar
Nik Dfine 2
Noise Ninja
Neat image pro
DxO Optics Pro 11 elite
Topaz DeNoise AI
Topaz DeNoise is an old piece of software; last year it released an AI version that immediately caught my attention. When I first tried it, the results weren't good — it often made particularly silly mistakes.
But the advantage of AI software is that it can rapidly adjust and improve its algorithms through continuous upgrades. With the March 2020 upgrade, its results finally amazed me, and I decided to use AI for high-ISO image processing. Because AI's interpolation capability is fundamentally different from old denoise software, the new "Jeff Workflow" had to change accordingly.
2. How AI Denoise Software Differs from Other Denoisers
Technically, the essential difference between AI denoise software and traditional whole-image uniform denoising is DRIR: Detection, Recognition, Interpolation, and Re-rendering.
"Detection" is the analysis of unclear pixel contrast to locate what's in focus, what's out of focus, and where the edges are.
"Recognition" is understanding the image content and comparing it against a database to make logical inferences about the image's textures.
"Interpolation," building on detection and recognition, interprets the unclear parts of the frame (especially out-of-focus and noisy areas), redefines and rearranges pixels in low-quality regions, and computes varying degrees of noise reduction and detail repair based on content.
"Re-rendering" rearranges the pixels according to the interpolation results, rendering a new image.
Below we'll use real examples to show how the new "Jeff Workflow" leverages these capabilities to denoise high-ISO images and control image quality.
"Jeff Workflow 2.0" Step 1: Expose to the Right (ETTR)
Key point — the crucial thing in this step: the right side of the histogram must not be cut off (unless intentional), to prevent highlight clipping.
Since photographer Michael Reichmann's 2003 article "Expose Right," countless articles over 12 years have discussed the scientific basis of ETTR — interested readers can search for them. Let me briefly explain what exposing to the right means:
"Exposing to the right" means using exposure compensation to deliberately overexpose the image to a degree — while keeping highlights unclipped — so the histogram shifts right, reducing the amount of noise and improving image quality.
First, let's look at the histogram:
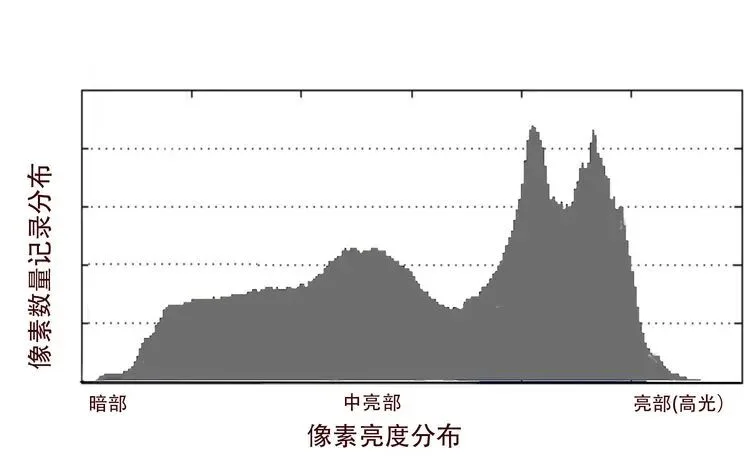
The histogram's horizontal axis is image brightness: shadows on the left, pure black at the left edge; brighter toward the right, with pure white at the right edge.
The vertical axis is the distribution of recorded pixels — the higher, the more pixels. The image above is a typical histogram of a normally metered, normally exposed image: there's some distance from both edges, meaning no dead-black or blown-white areas.
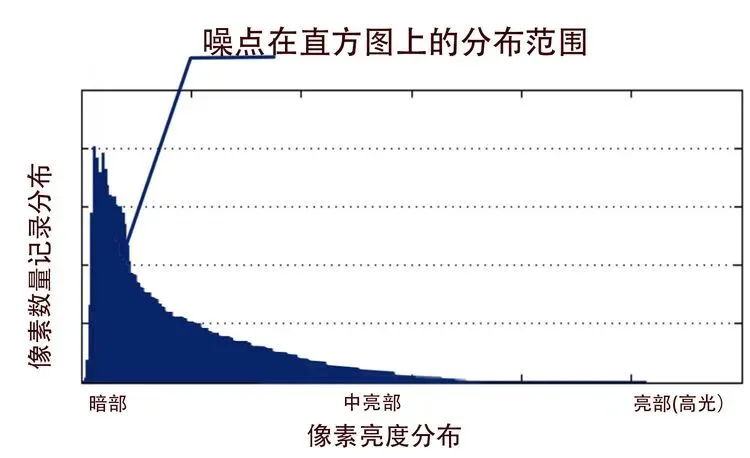
The trend of noise distribution in the histogram is shown below: noise concentrates in the dark areas, drops sharply as brightness increases, mostly disappears around midtones, and is almost absent in the highlights:
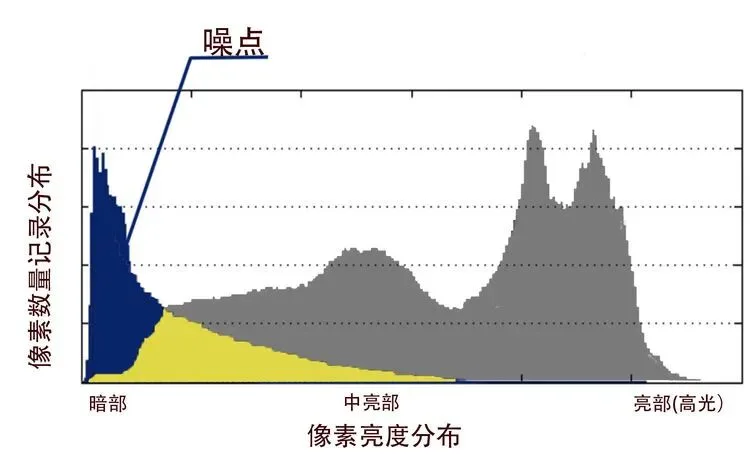
Overlaying the two charts, the overlapping region of their recorded pixel signals (yellow) shows where noise appears and how much:
If we add one stop of exposure compensation when shooting, we get the histogram in red, overlaid on the previous one:
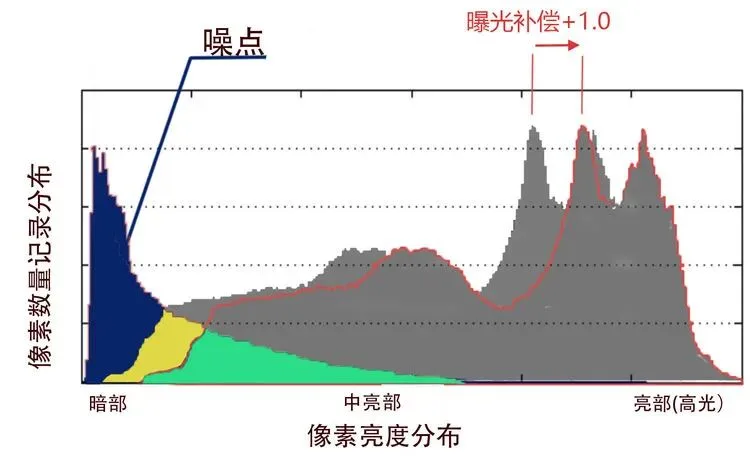
We can see the new histogram is brighter overall, but its right side isn't cut off by the right edge — the highlights aren't clipped and bright detail is preserved — while the whole histogram has moved right.
That's "exposing to the right": its overlap with the noise distribution (green) is smaller than the normal exposure's overlap (yellow) — meaning less noise after ETTR.
This is the physical principle by which ETTR reduces noise: with the same total amount of recorded image signal, the ETTR image contains less noise, so the ratio of recorded signal to noise — the signal-to-noise ratio (S/N) — is higher. S/N ratio is one of the most important measures of image quality: the higher, the better.
Note: in practice, the right degree of ETTR differs for every shot — how much to overexpose depends on subject, scene, and light direction, and must be adjusted on the fly. It's a complex topic beyond the scope of this article; I'll cover it separately.
The main principle: expose to the right, but keep the histogram's right side from being cut off by the right edge, so highlights don't clip and lose detail. When shooting, I usually test-fire a few frames in different directions of the scene, check the histogram doesn't clip, and then decide how much to overexpose.
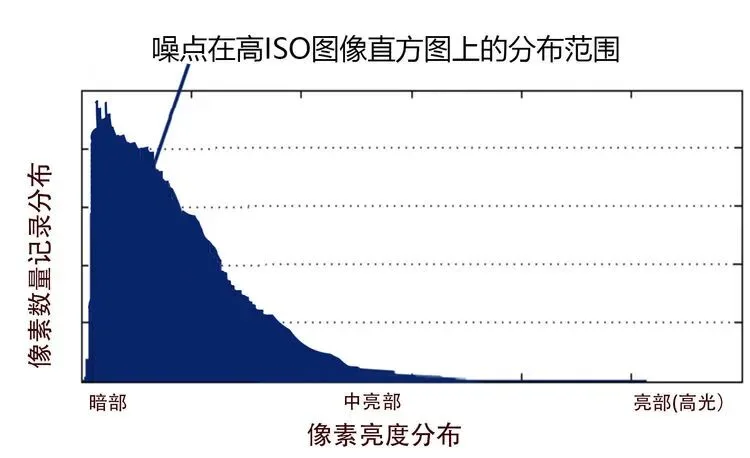
The noise-distribution trend for high-ISO images is shown below: high-ISO images have more noise, but the curve follows the same rule — noise drops sharply as brightness rises and nearly vanishes past midtones. So ETTR matters even more for high-ISO shots:
Now let's use a real example to demonstrate ETTR's effect:
In many photography groups these past two years, the ETTR theory has been much discussed. One fairly common claim is that as CMOS sensor dynamic range keeps improving — especially with the equally excellent sensors in Nikon, Sony, and medium-format cameras — ETTR has become unnecessary, and you can even underexpose.
The argument: compared with high-ISO images, a low-ISO (below ISO 200) image's shadows can be brightened to recover the same shadow detail with equal or less noise — while guaranteeing the highlights never clip.
Let's test this theory. Below are three frames of the same scene shot with Nikon's new flagship D6: the first at normal metered exposure, ISO 220; the second underexposed −0.67 EV from the meter reading (center-weighted metering), ISO 160; the third exposed to the right at +2.67 EV (ISO 1250) without the histogram touching the right edge. The exposure difference between them is 3.3 stops:
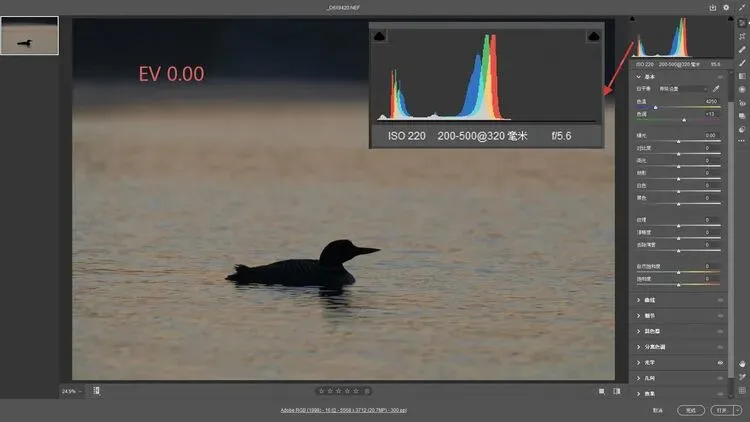
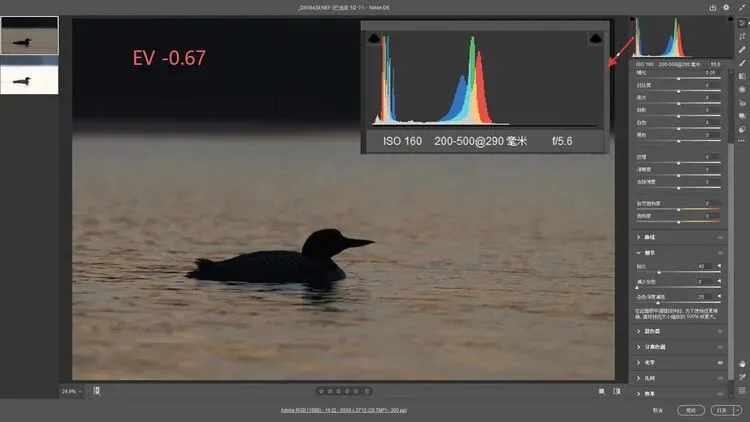
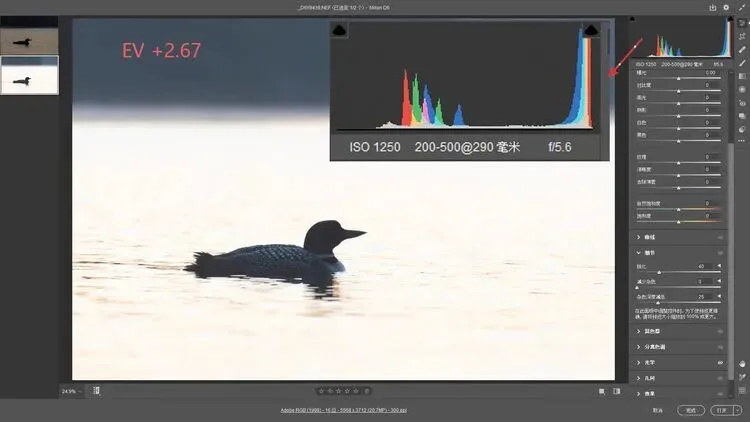
From the three histograms we can see: the normal and −0.67 EV histograms concentrate their digital signal on the left, heavily overlapping the noise-distribution zone; the +2.67 EV histogram hugs the right edge without being cut — no highlight clipping — and barely overlaps the noise zone. Let's do a simple adjustment in ACR:
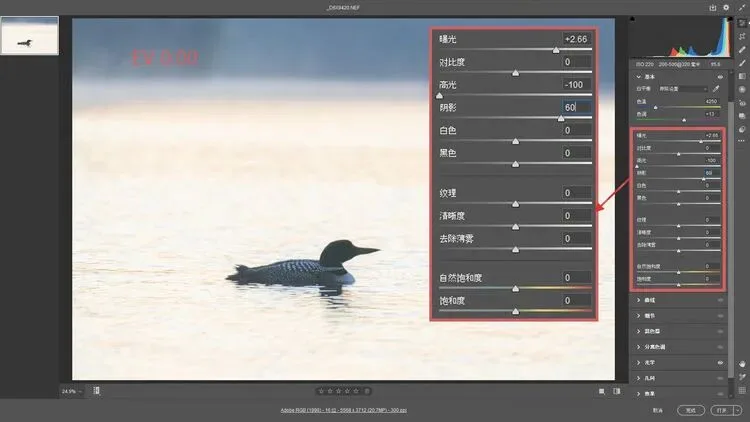
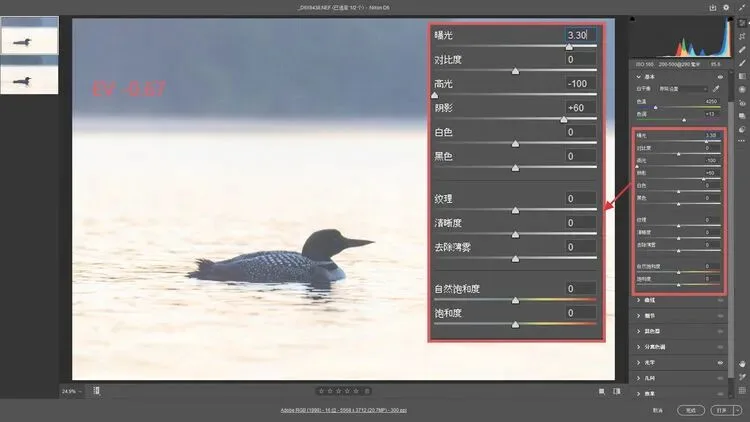
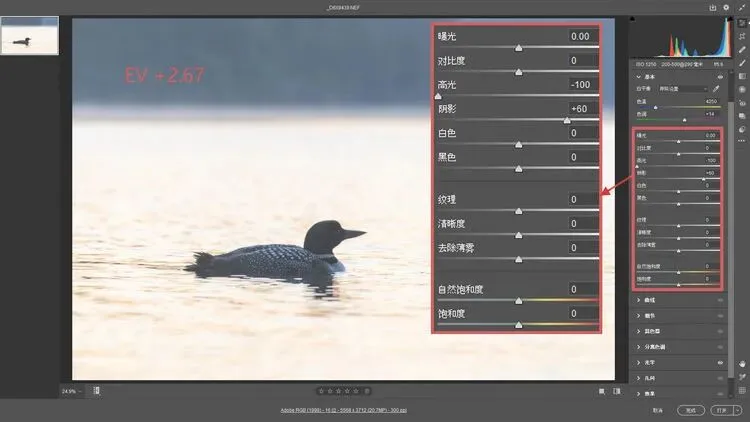
None of the three is denoised or sharpened; Highlights pulled to minimum to preserve all detail; Shadows lifted to +60 to bring out dark-area texture. The only difference: exposure raised +2.67 on the first and +3.3 on the second to sync with the third.
Then we open all three in Photoshop and zoom the bird's head to 200% for comparison:
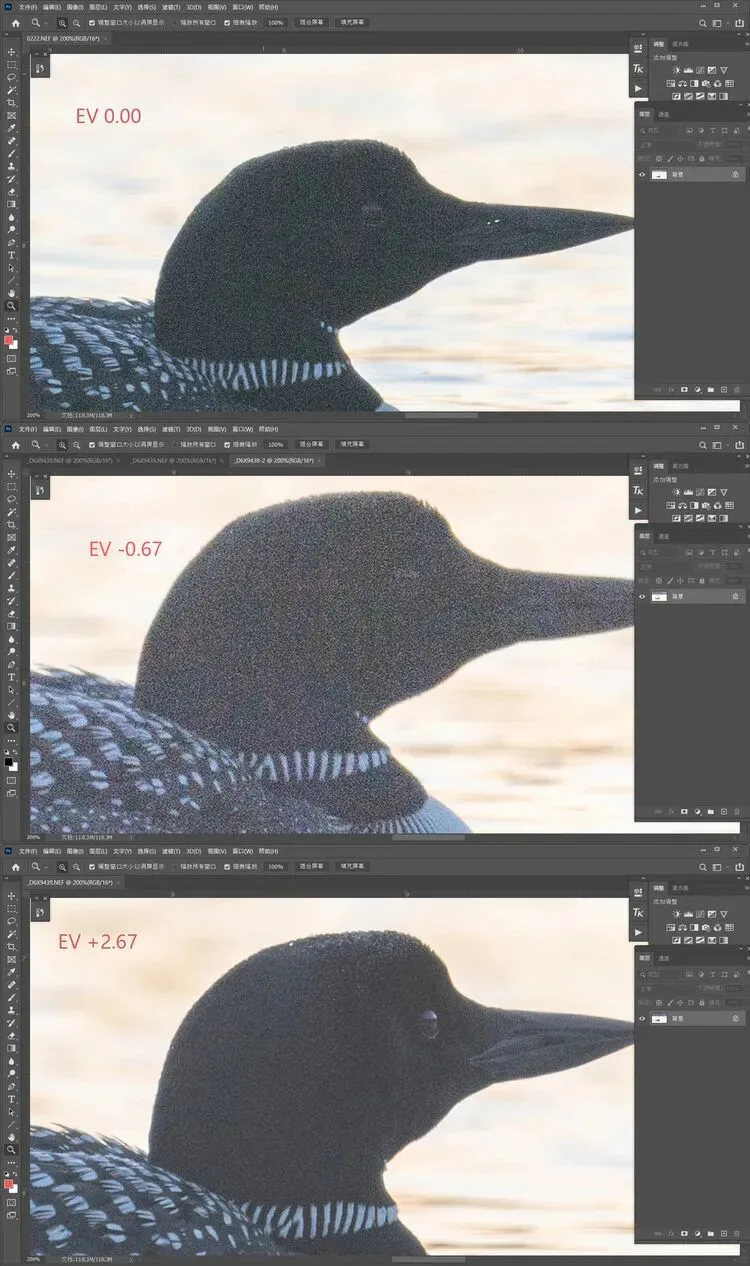
The overexposed third frame has very weak noise, easily removed by a plugin; the bird's eye edges are clearly defined, dimensionality is strong, and image quality is excellent — even though this frame is ISO 1250.
The normally exposed first frame has lots of noise on the bird's head, indistinct eye edges, and poor shadow quality — especially in this backlit scene where the bird, the subject, sits entirely in the dark zone. This quality is hard to accept.
The underexposed second frame's bird head is full of noise and the eye boundary is indistinguishable — even though it's only ISO 160. Zooming to 400% as below, we see massive red-green-blue color-noise stripes, making the quality completely unusable:
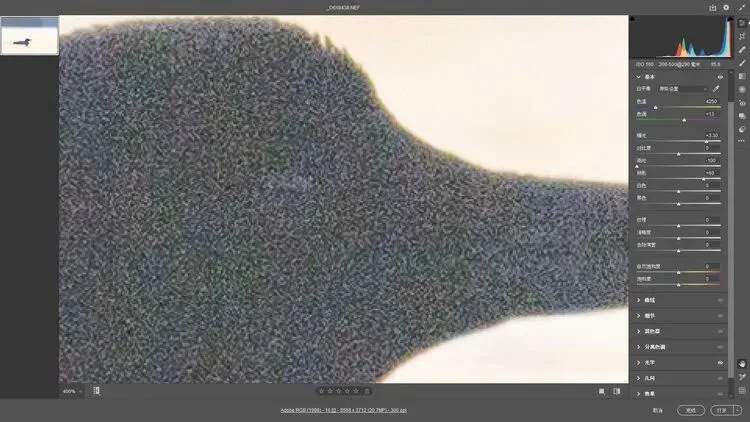
These three RAW files can be downloaded from the cloud drive — compare them yourself:
(Link: https://pan.baidu.com/s/1w2-5QmEAWas5TIqeNvZC2w Extraction code: px57)
One-sentence summary: the theory that keeping ISO low — without overexposing, or even underexposing — preserves image quality doesn't hold up. Histogram-based "expose to the right" is the best way to preserve quality, because it's determined by the physics of how sensors record signal and noise: noise concentrates in the dark areas.
"Jeff Workflow 2.0" Step 2: RAW Processing — Keep All Detail, Including Noise. Do NOT Denoise!
Key point — the crucial thing in this step: do NOT denoise in ACR.
Emphasizing a second time: compared with the old Jeff Workflow, this step is the biggest difference. The single most important thing in ACR is: do NOT denoise!
Let's study this with the ISO 14,400 cheetah-hunt image. Here's the original:
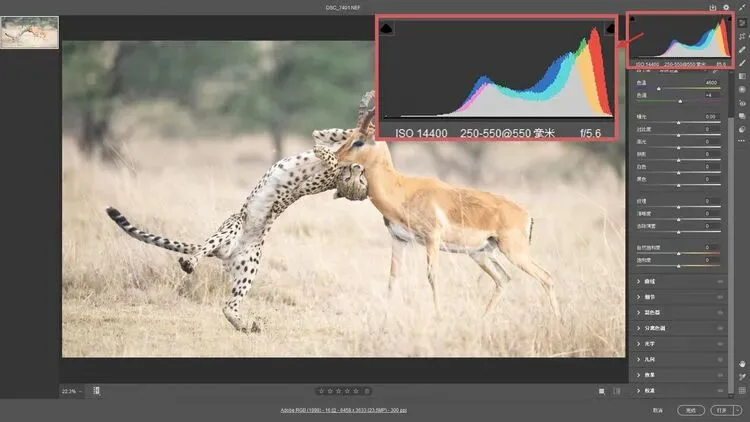
Note my first-step ETTR control: while waiting before the hunt, I shot test frames and determined that +1.33 EV gave a perfect histogram position — highlight signals not cut off at the right edge, but most of the signal distributed on the right side. The frame looks somewhat whitish; that's the hallmark of an ETTR exposure.
Most importantly, watch the histogram and confirm the right edge isn't cut. The camera's 3-inch preview can't show this clearly, so exposure must be judged by the histogram. Now let's analyze this unadjusted RAW file, zoomed to 200%:
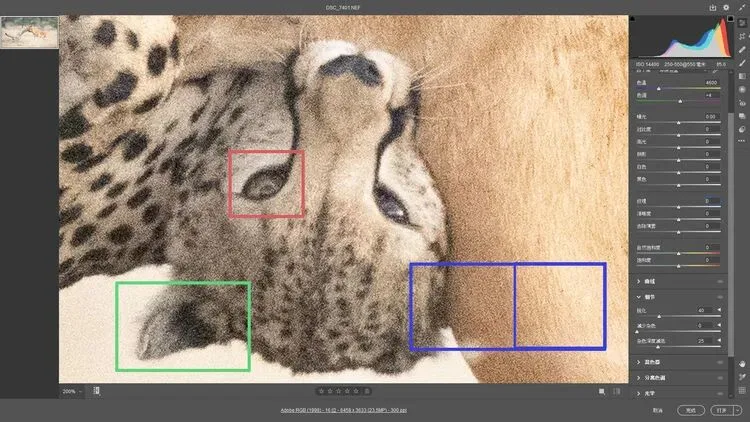
From this crop we draw several conclusions that must be solved in post:
1. Even with well-controlled overexposure, an ISO 14,400 image zoomed in shows lots of noise — mostly uniform gray luminance noise.
2. In the blue box, we can see the bright right side has less noise than the dark left side — noise decreases as brightness increases.
3. In the green box, the fine fur edges caused by high ISO aren't clear enough.
4. In the red box, since the left side of the leopard's head is basically in the dark zone, the eyeball boundary isn't clear, the whites of the eye aren't clean, and they mix with the noise in the dark eye-socket area.
When I processed this image with the old Jeff Workflow, I used composite denoising: I made three differently denoised and adjusted versions of the same RAW file, stacked them into one image, and manually blended the three layers with luminosity masks and regular masks — about 45 minutes of work. Now, using AI denoise software, I need only 9–10 minutes.
Now let's discuss the RAW processing principles:
Provide the AI algorithm with as much detail and texture data as possible, especially in the dark areas. Bright areas are clean and low-noise; dark areas are blurry and mixed with noise, so brightening the dark areas helps the AI software identify content and separate noise more accurately.
Further brightness and contrast adjustments can be made later in the editing software, after denoising.
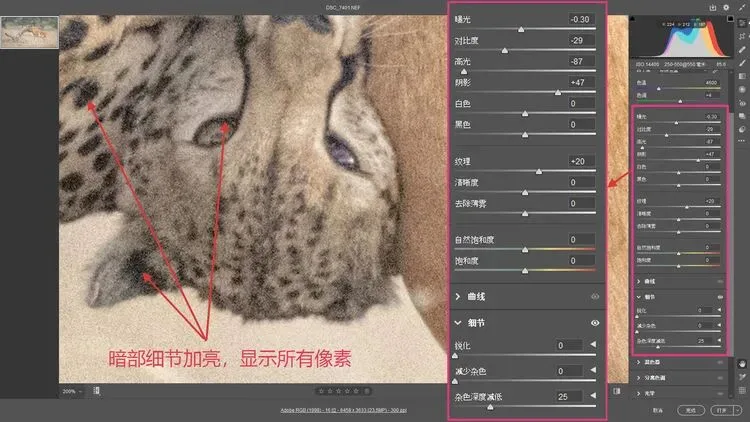
Here's my RAW processing. Note these settings differ for every image — understanding WHY matters more than the specific numbers:
1. Exposure: we overexposed this frame by +1.33 EV, but I only pulled it down −0.3 EV, because part of the leopard's head sits in the dark zone and we need it brighter.
2. Reduce contrast: raising contrast darkens the dark areas; reducing contrast effectively reveals dark-zone pixel detail. But one caveat: don't lower it too much — too low blurs the edges between noise pixels and shadow-texture pixels, making it hard for the denoise software to tell which is texture worth keeping and which is noise.
After processing 40+ images, my experience is that lowering contrast to around −20 to −35 in ACR works best: within this range, the bright-to-dark transition of pixel detail stays delicate, with little loss of edge definition.
3. Highlight recovery: I usually drag Highlights all the way left, at least −80. Since we'll make the image brighter, pulling highlights down preserves bright-area detail completely.
4. Shadow lifting: this step also exposes more shadow detail. How much to lift depends on the image's own brightness and the darkest point on the subject (the cheetah's body below). Don't lift too much: luminance noise is gray, and overly bright shadows blur the distinction between noise and dark texture.
The principle for lifting shadows: pull texture out of the blackest areas, but not too bright — preserve the optical logic of light and dark while revealing as many texture pixels as possible (see the blackest spots of the cheetah's rosettes indicated by the red arrows below).
5. Texture: I strengthen Texture somewhat to counteract the softening of pixel edges caused by reduced contrast, helping the AI better recognize texture content. Don't overdo this either: for accurately focused images in ACR, I recommend 0–25 (based on my hands-on experience).
[In ACR, "Texture," "Clarity," and "Sharpening" all increase apparent sharpness by adding local contrast. "Sharpening" mainly strengthens the light-dark contrast at pixel edges; it's imprecise for low-contrast micro-textures in midtones and increases noise. "Texture" is the most refined "high-frequency" contrast boost for small midtone textures and rarely adds noise. "Clarity" sits between the two.]
6. In ACR, be sure to turn "Sharpening" and "Noise Reduction" completely off — set both to 0.
This step matters. Sharpening at 0 prevents generating more noise; the AI denoise software will sharpen automatically based on content in the next step.
Turning off "Noise Reduction" maximizes the amount of recorded signal data (including noise), letting the AI's detection, recognition, and judgment abilities work at their limit. We know that once we start denoising in ACR, texture detail begins to disappear — trust the AI's ability to identify and remove noise.
After these adjustments, open the file into Photoshop for AI denoising and sharpening.
"Jeff Workflow 2.0" Step 3: Denoise and Sharpen with AI Software
Key point — the crucial thing in this step: turn on "Auto-detect settings" so the AI's abilities are fully unleashed.
In this step we use Topaz DeNoise AI for denoising and sharpening.
Why Topaz: as of now (July 2020), it's the only relatively mature AI-algorithm denoise software on the market. As technology advances rapidly, I'm sure more such software will appear, and I'll keep testing and reviewing them.
First, install Topaz DeNoise AI — it can also run as a standalone application alongside Photoshop.
After processing the RAW file in ACR, we open it into Photoshop, then 1) press "Ctrl+J" to create a new layer and rename it "Topaz AI 1"; 2) click "Filter" → "Topaz Labs" → "Topaz DeNoise AI…" on the top bar:
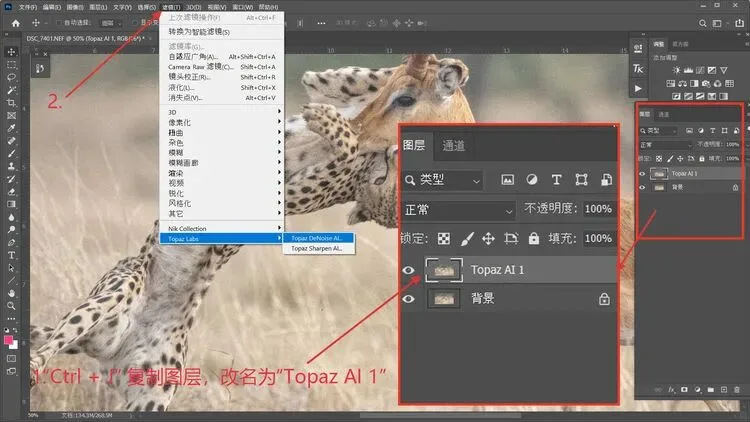
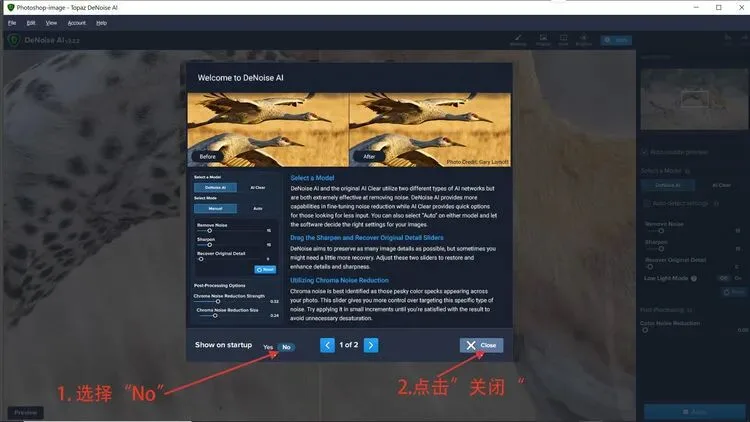
The Topaz DeNoise AI interface opens. The first time, we need to do three things:
1. Close the intro popup: it appears every time the interface opens. Choose "No" first, then click "Close," so it won't pop up again.
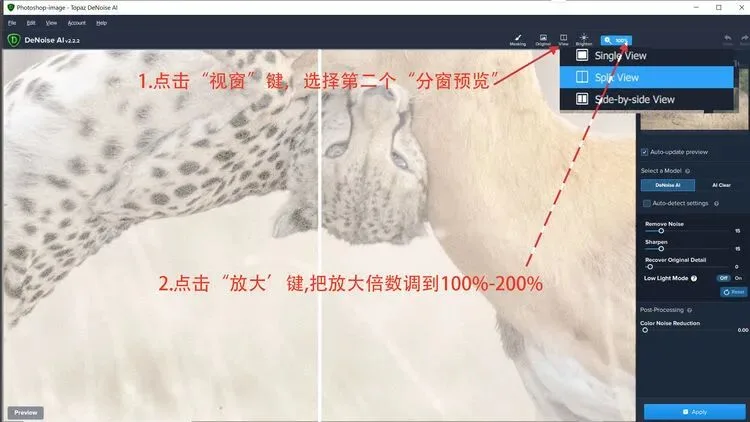
2. Set the preview mode:
1) Click the "View" button and choose the second option, "Split View" — a vertical line appears in the middle: denoise-before on the left, denoise-after preview on the right.
2) Click "Zoom" and set 100% or 200% — the most direct way to check denoise detail (I usually use 200%, but habits differ). The preview layout is then fixed for every future launch.
Let's introduce the interface first:
Topaz AI currently has no official Chinese version, and as a professional photographer I can't recommend those "cracked green localized versions";
But to use this plugin proficiently, understanding the few simple adjustment keys below is enough. Among them:
4. "Recover Original Detail," 5. "Low Light Mode," 6. "Color Noise Reduction" — these three are basically unused,
so we only need to master keys 1, 2, and 3.
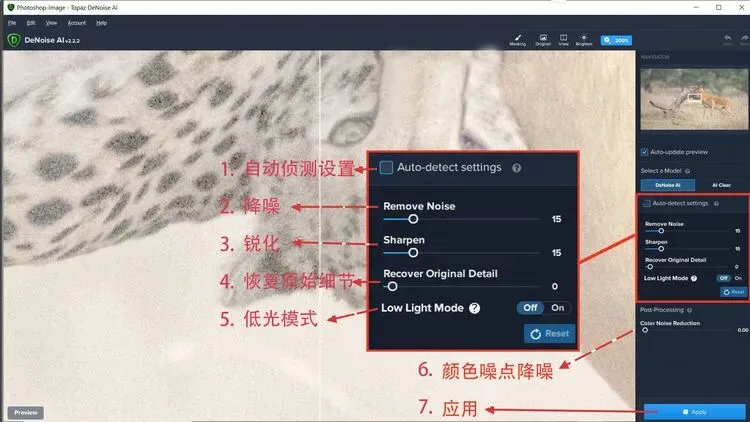
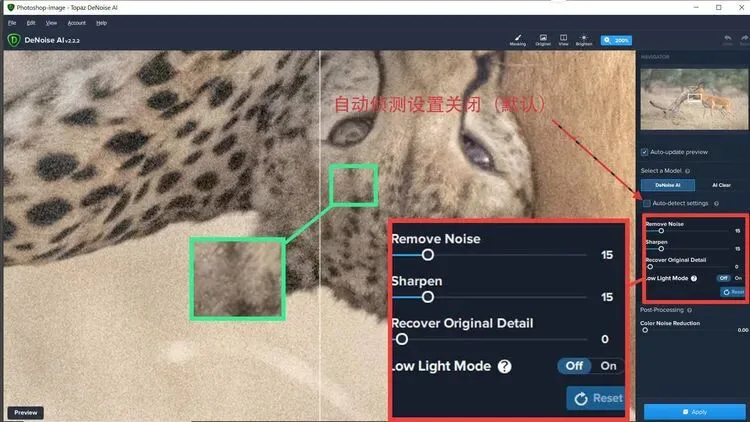
Now let's denoise the cheetah-hunt photo. Upon entering the interface, Topaz automatically generates a default denoise result — note the "Auto-detect settings" key is OFF by default. This default result is uniform denoising (denoise 15, sharpen 15).
We can see visible noise remains in the background below the cheetah's head, while the fine-fur texture in the green box on the face has already started to weaken. Of course we could manually change the denoise strength, but detail starts to be lost — such results barely differ from other denoise software. That's because with "Auto-detect settings" off, the AI capability isn't fully enabled:
Click the "Auto-detect settings" button to turn it on (yellow arrow): the AI fully opens up, performing detection–recognition–interpolation calculations, and forms the preview below:
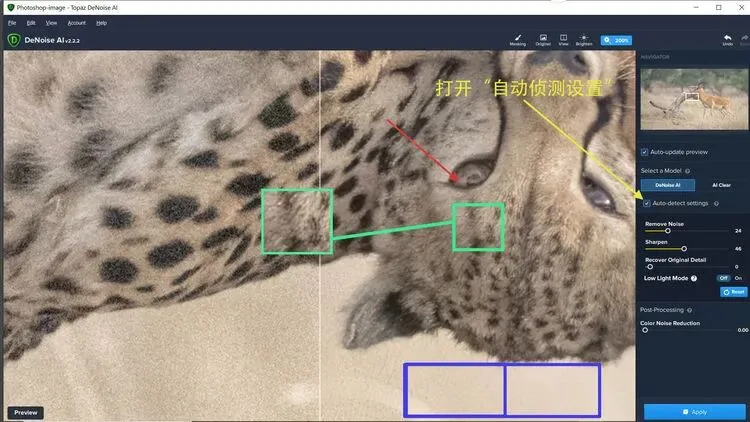
In this AI preview we see:
1) The fine-fur texture on the leopard's face is strengthened and sharpness improved.
2) The eye: the eyeball boundary is clear, the whites are clean, the eye-socket edges are well defined, textures are crisp — the result of AI recognition and interpolation redefinition.
3) In the blue-boxed background, the right side is clean, while on the left some original noise was kept as texture. Don't worry yet — click "Apply" and let the software re-render the Topaz AI 1 layer; this takes about 3–4 minutes.
Our next step is to deal with the unnecessary texture enhancement in the background.
In Photoshop, make another copy of the unprocessed background layer, rename it "Topaz Background," and open this layer in Topaz AI:
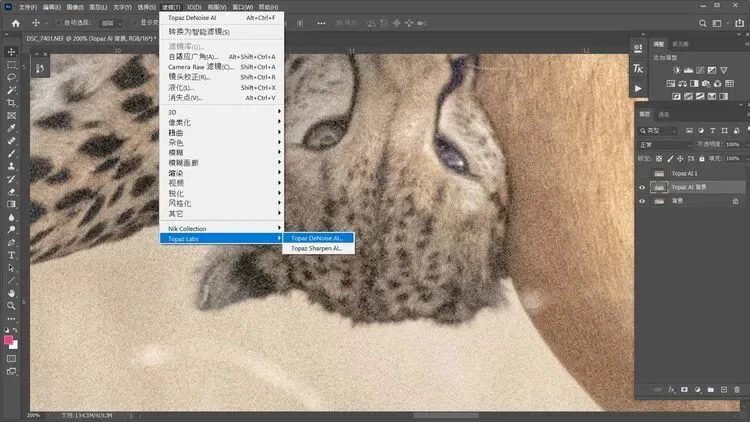
Likewise click "Auto-detect settings" to generate the same preview as above; then manually drag the "Remove Noise" slider right while watching the texture in the background under the cheetah's head, and stop when the texture turns smooth.
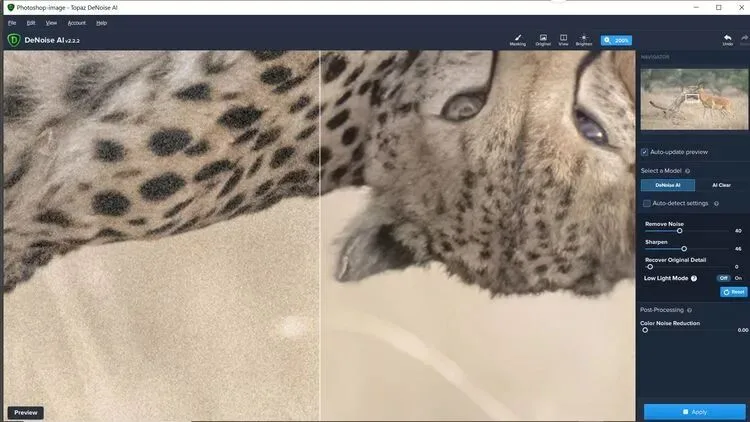
Then click "Apply" to re-render the Topaz Background layer. (Note: once we start manual adjustment, "Auto-detect settings" turns off.)
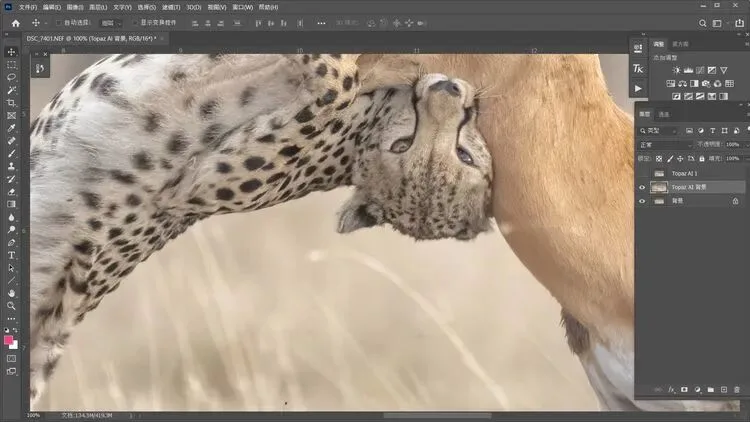
Now we have three layers. The top is Topaz AI 1: the subject (cheetah) is sharp, but the background has some unwanted texture.
The middle is Topaz Background: the background is smooth and clean, but the subject is slightly less sharp.
The bottom is the original background layer with no denoising.
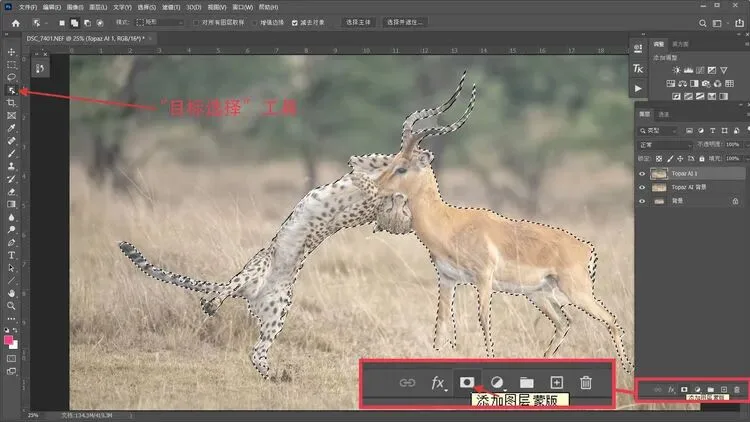
Next, we'll use a mask to composite the sharpest subject from Topaz AI 1 with the background from the Topaz Background layer.
First go back to the top Topaz AI 1 layer. Use Photoshop's "Select Subject" tool to select the cheetah and the antelope, then switch to "Quick Selection" for a more precise selection, and click the "Add Layer Mask" button at the bottom of the Layers panel:
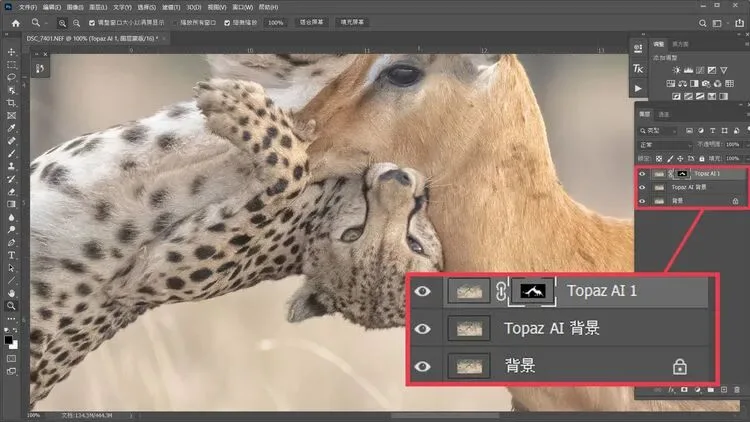
The mask hides everything outside the selection, keeping only the sharp subject on top. Zoom the composited layers to 100%: the subject is very sharp, the background clean and smooth.
With full denoising and quality preserved, we can now adjust contrast and color. Let's compare the final piece at 100% with the version I made using Dfine 2.0 under the old Jeff Workflow.
The right side, processed by Topaz DeNoise AI, is astonishingly good in clarity and detail — remember, this is an ISO 14,400 image:
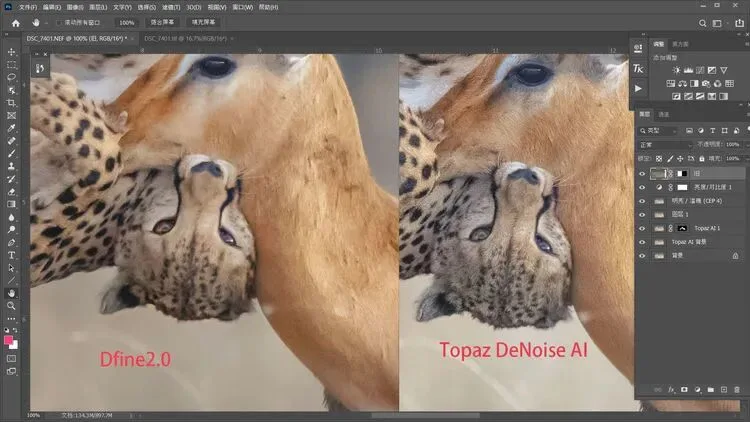
This points to another possibility: AI denoising preserves so much detail and quality in high-ISO images that we can redo older works we weren't satisfied with.
Better quality also opens the door to using AI interpolation for upscaling frame size — undoubtedly great news for photographers everywhere.
Key point again: what if we denoise in ACR…
I've stressed it twice already: the most important thing with AI denoising is not to denoise in ACR. So what happens if we do? See below:
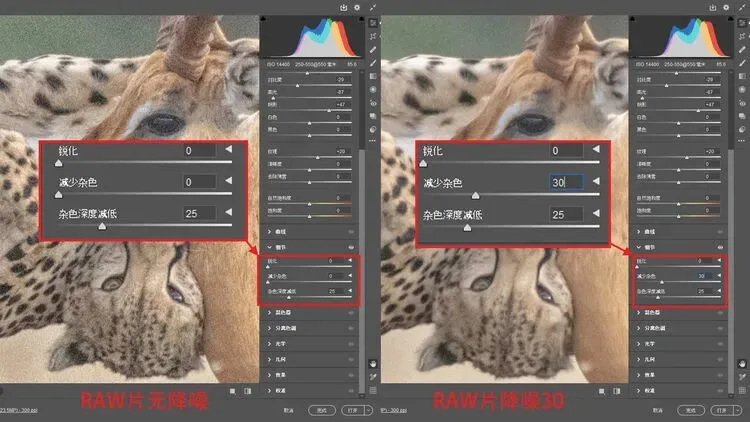
For an ISO 14,400 image, partially denoising in ACR first (I used 30 on the right) and comparing at 100% with the un-denoised frame on the left, the noise (especially in the background) seems much improved — surely running Topaz afterward should give even better quality?
Wrong! Below is the comparison after opening both in Topaz with AI enabled:
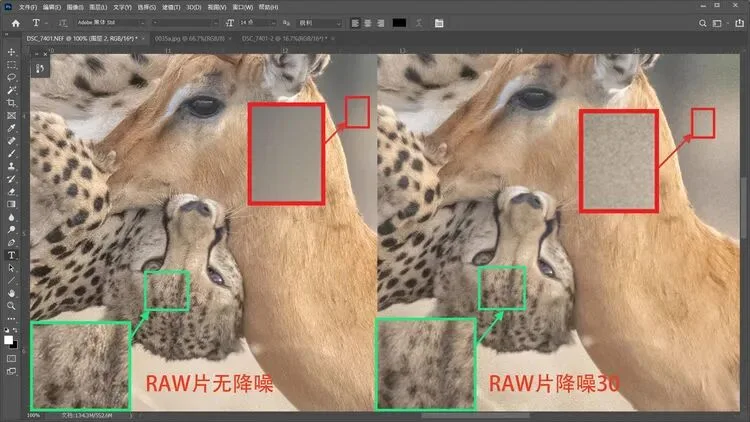
Compared with the image generated from the un-denoised original, the image from the pre-denoised RAW (right) still has noise in the red-boxed background, while the left one from the untouched original is clean and smooth. In the green box, the leopard's fur texture is clear in the original-based version but relatively blurry in the pre-denoised one.
Not denoising the RAW file maximizes the recorded signal data (including noise), letting the AI's detection, recognition, and judgment work at their limit — if you use it, trust it! Pixel loss from pre-denoising greatly weakens the AI's detection ability and destroys its advantage.
Saying it a third time because it matters: do NOT denoise in ACR!
For professional photographers, AI denoising's quality preservation lets us shoot more freely in the most extreme environments, without worrying so much about high-ISO limits.
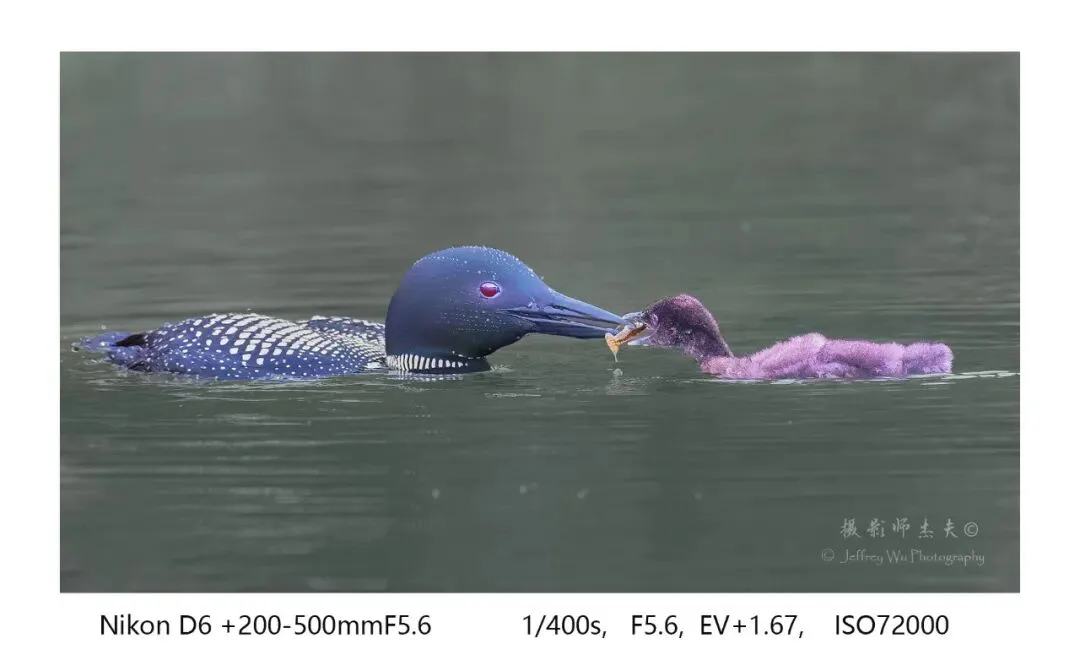
The image below was shot three days ago using "Jeff Workflow 2.0" — at ISO 72,000! Yet the quality is excellent. Such a high ISO is extremely rare even in my career. Let's see how it was done:
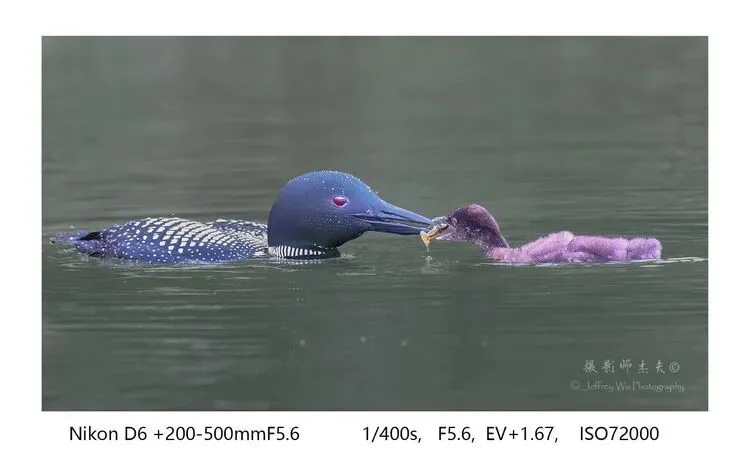
Here's the original. Excellent quality at ISO 72,000 still relies on "exposing to the right": after a few test frames on site, I settled on +1.67 EV, which put the histogram in a very good position, largely avoiding the noise-distribution zone:
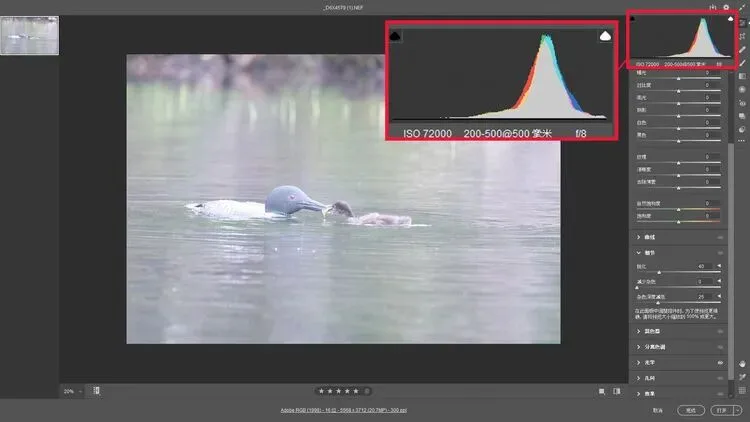
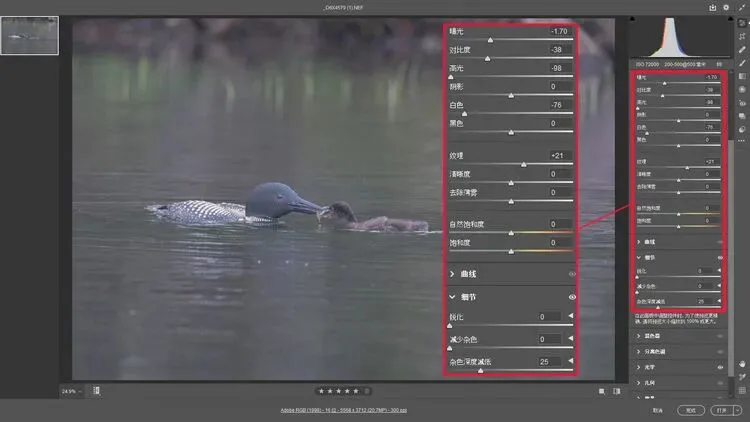
In ACR I made the following adjustments:
1. Because of the +1.67 ETTR overexposure, I first reduced exposure by 1.7 stops.
2. Reduced contrast to preserve shadow detail.
3. Reduced highlights to further protect bright-area detail.
4. I did NOT lift shadows, because the dark areas were already bright enough.
5. Lowered Whites to turn white slightly gray, reducing contrast in the frame.
6. Strengthened Texture a bit to keep pixel edges clear.
7. Dropped Sharpening and Noise Reduction to zero, maximizing preservation of all texture signals.
After opening the RAW into Photoshop, I duplicated the background layer, opened that layer in Topaz DeNoise AI, clicked "Auto-detect settings," and generated the preview. Let's look at 100% magnification:
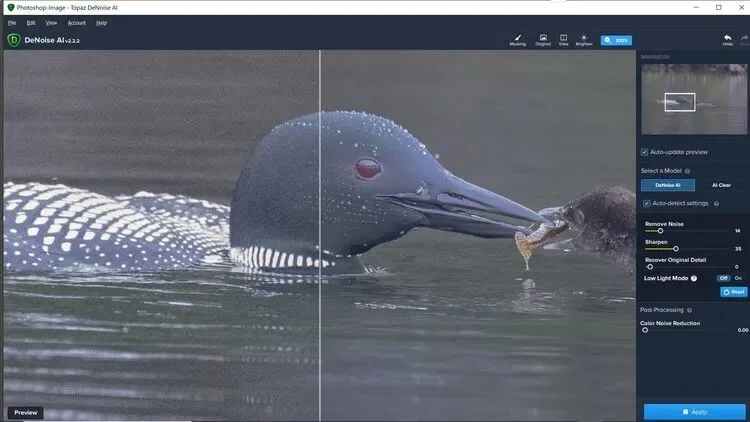
All detail is preserved. In this image the AI accurately defined in-focus and out-of-focus areas: the in-focus subject is crisp and sharp, the out-of-focus areas smooth and clean, the whole frame noise-free — with superb subject detail.
So I didn't need a second background version at all. Then I clicked "Apply" to render, returned to Photoshop, and zoomed to 100% for a careful check:
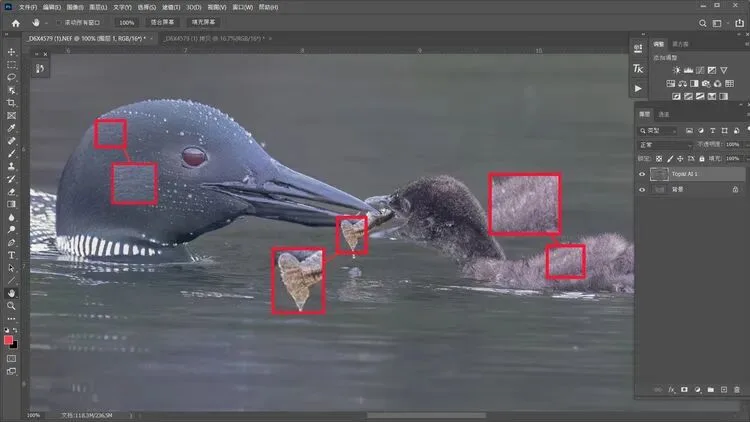
We can see: ISO 72,000 with no noise, while the dark-area texture on the bird's head, the crayfish's details, and the chick's soft feathers are all very clear, and the out-of-focus background is silky smooth. The AI's analysis and recognition of this image's content is nearly perfect.
Next we crop the frame — the final image's long edge is only 3,188 pixels:
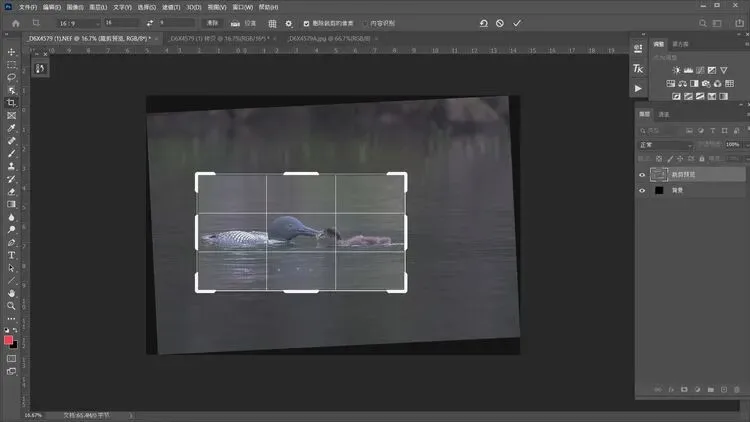
We then fine-tune local brightness, contrast, and color — and here is the final ISO 72,000 work:
"Jeff Workflow 2.0" Step 4: Final Quality Control — Resizing and Sharpening
Sharpening in "Jeff Workflow 2.0" is largely unchanged from the old version.
Our digital photos have exactly two uses: first, sharing online — posting, entering photo contests, and so on.
Second, print output at various sizes — publication in magazines and newspapers, exhibitions, posters, or prints for the wall.
1. Web output: 99% of our images go to online sharing or digital photo contests. Two common traits: the size can't be too large — JPEG at up to 2,000 pixels;
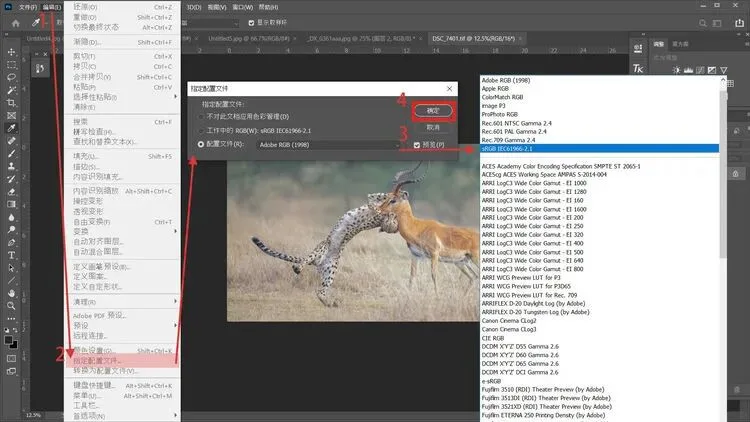
and the web's standard color space is sRGB, so photos for the web should be converted to sRGB.
Resizing for the web costs sharpness, while over-sharpening creates noise — so process control matters greatly. Here's the resize-and-sharpen method I currently use for web posting:
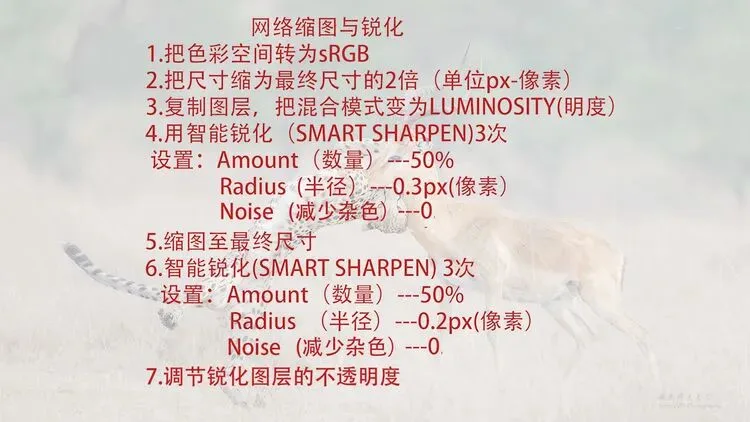
Take the cheetah image: say we want to resize it to 1,600px for online publication.
1. First, use "Convert to Profile" to convert the photo's color space from the working space Adobe RGB to sRGB:
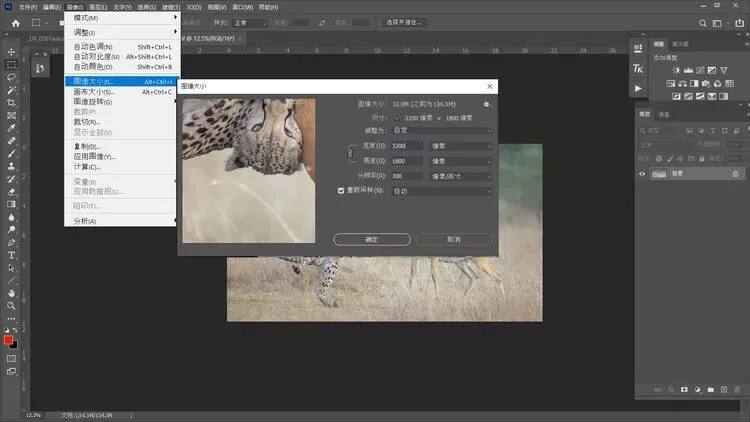
2. Resize the image to twice the final size (3,200px):
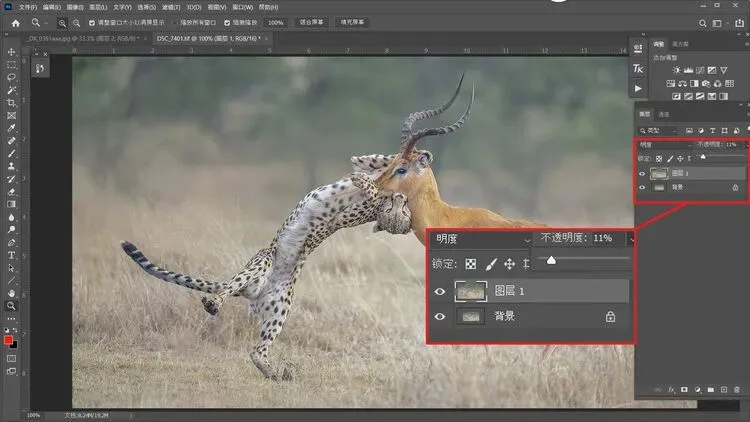
3. Duplicate a layer, then change the layer blend mode from "Normal" to "Luminosity":
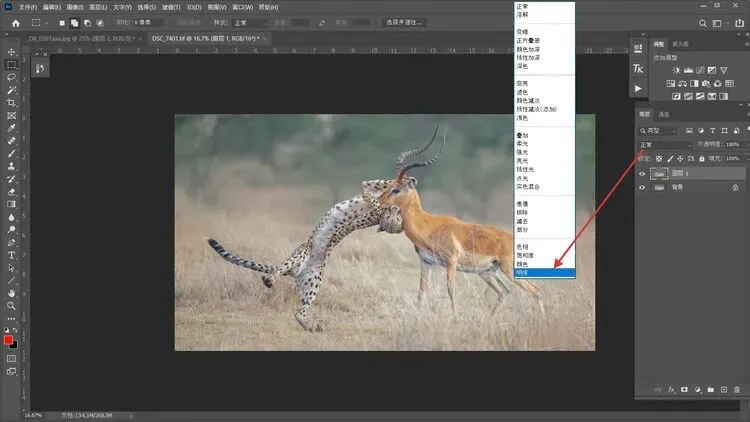
This makes the duplicated layer interact with the original based on luminosity — after we sharpen the duplicated layer, brighter areas get sharpened more and darker areas less, effectively preventing extra noise, since noise most easily appears in dark areas.
4. Apply Smart Sharpen to the duplicated layer with: Amount 50%; Radius 0.3px; Reduce Noise 0 — because we've already denoised. Repeat the sharpening 3 times in total.
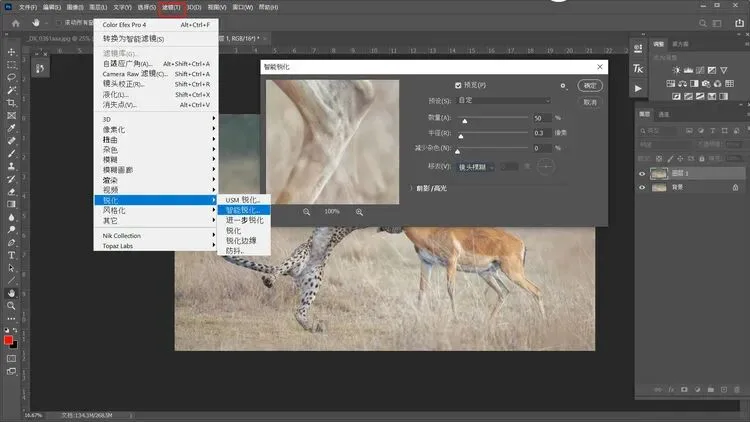
5. Resize to the final dimensions (1,600px).
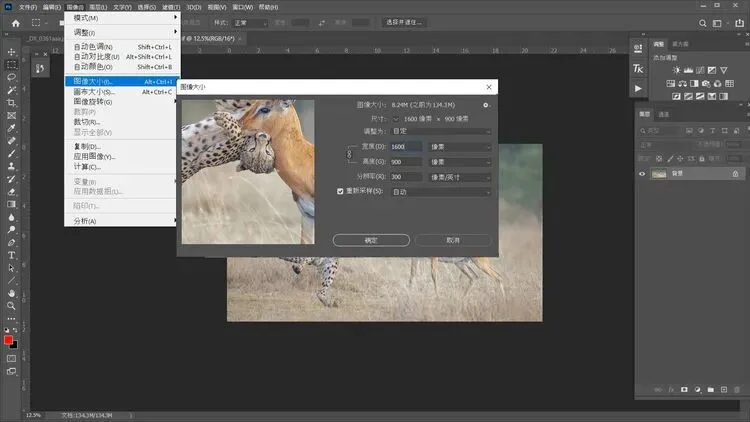
6. Apply Smart Sharpen to the duplicated layer again, with: Amount 50%; Radius 0.2px; Reduce Noise 0.
Repeat the sharpening 3 times in total. The image will now look slightly over-sharpened.
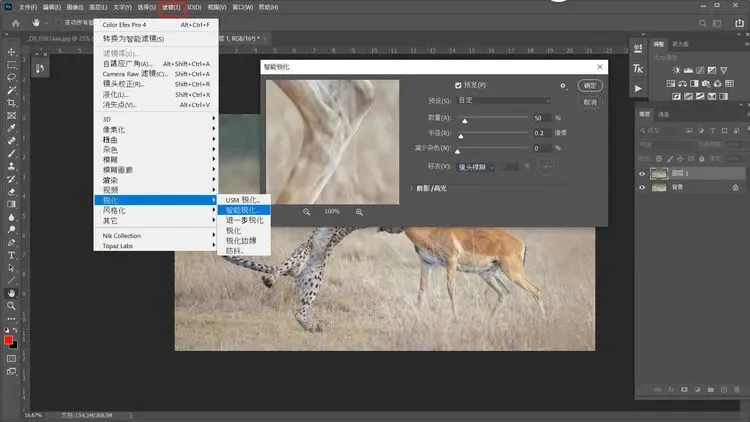
7. Finally, adjust the opacity of the sharpened layer while checking the image until sharpness and detail look right. The opacity depends on:
1) The original's sharpness — the sharper the original, the lower the opacity. 2) The Photoshop version. In my experience, with Photoshop CS6 or versions before CC 2016, opacity around 18–35 works; with Photoshop CC 2018/2020, 5–15 gives the best results.
Once satisfied with the sharpness, we can flatten the layers and save the image.
2. Print output: printing is usually dictated by the magazine, newspaper, or commercial client's requirements — they'll specify the size and color space of the files you deliver; some ask you to sharpen, others don't and have their technicians do the final adjustment.
If you print for your own exhibition, settings vary with print size, paper, printer brand, and model — too much to cover here. But if you sharpen yourself, remember three principles:
1. Always work on a duplicated layer with the blend mode set to Luminosity, to minimize extra noise.
2. Always sharpen progressively in two steps, still at 50% Amount — several light passes beat one heavy one. Try different Radius settings for different sizes; the smaller the size, the smaller the radius. The principle remains: prevent over-sharpening and extra noise.
3. With Topaz DeNoise AI's "Auto-detect settings" on, the AI itself sharpens during rendering, so its output is inherently sharper than a traditional TIFF file — watch the image when adjusting the sharpening layer's opacity to avoid over-sharpening.
That concludes "Jeff Workflow 2.0 — AI Denoising and Quality Control for High-ISO Images."
AI software's ever-faster, ever-wider application in photography — from camera hardware to post-processing software — is the newest technological trend.
Future AI technology will replace traditional techniques across all aspects of photography at tremendous speed. For photographers who want to stand at the forefront of the times, we shouldn't reject this arrival — we should embrace it with greater enthusiasm.
AI software is still being perfected, but it can already help us photographers preserve our work's quality to the maximum. The excellent quality achievable in low-light, high-ISO shooting gives us more creative space and flexibility.
Finally, let me re-emphasize the three most important points of "Jeff Workflow 2.0," plus two suggestions:
1. "Expose to the right" matters even more — whether the shadows can be brightened is the most important prerequisite for the AI's detection accuracy and thus for high image quality.
2. Don't denoise or sharpen the RAW file — leave that to the AI software.
3. When using Topaz DeNoise AI, be sure to turn on "Auto-detect settings" to fully leverage the AI algorithm.
Two suggestions:
1. Keep your AI software updated — the algorithms will get ever more precise and advanced. I'll also keep trying new software and sharing my experiences.
2. If the AI software doesn't meet your needs, or it keeps acting up and doing strange things, you can always go back to the old "Jeff Workflow" to solve high-ISO noise problems.
I'll close with the same line as before, to explain why I summarized and publicly shared "Jeff Workflow 2.0":
"May this article help photographers everywhere."
Thanks for reading!
Jeff, written in Toronto, July 2020.
Author: Jeff
— Author of "The Beauty of Wildness: A Wildlife Photography Journal"
— Professional wildlife and landscape photographer certified by the Professional Photographers of Canada (PPOC)
— Contract photographer for three UK news agencies: Solent, Mercury, and Caters
— Resident photographer at Game Watcher Safaris, Kenya
— Resident photographer at Lentorre Lodge, Kenya
— Judge for the Nikon Photo Contest
— Africa-region judge for Nature's Best Photography Competition
— Certified judge of the Canadian Association for Photographic Art
— Chair of the Jury Committee, Toronto International Photography Festival, 2015 & 2017
— International Promotion Director of China Bird Net
— President of the Canada Chinese Masterpiece Photography Association
— Chief Curator and Art Director of Shanghai Fengrui Image Culture Communication Co.